Top 12 Hairstyles Of The Year
Annual Year In Review. Our Top 12 Hairstyles Of 2013 Countdown.
Please enjoy a look at our top 12 favorite hairstyles from this past year. The links to the tutorials for these braids, buns, and hairstyles are located above the following pictures...
#12 SideSwept Braids And Curls
#11 Fairy Wings Braid
#10 Criss Cross Waterfall Twist
#9 Twist Wrapped Fishtail
#8 Swirling Braids Updo
#7 Twisted Knot Bun
#6 Anna's Coronation Bun (Disney's Frozen)
#5 Arrow Braid and Fishtail Bun
#4 Suspended Fishtail Braid
#3 Feather Chain Braid
#2 Woven Knot Hairstyle
#1 Pinwheel Bun
We're looking Forward To Many More Hairstyles In 2014! Thanks so much for joining us!!
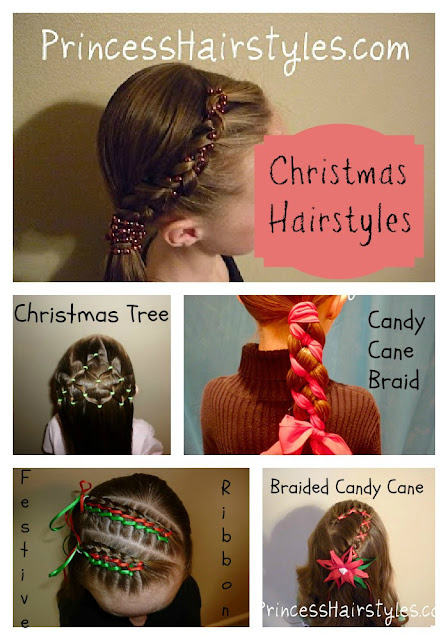
Christmas Hairstyles
For The Holiday Season,
A Few Christmas Hair Styles Or New Years Eve Hair Ideas To Share...
Christmas is fast approaching! Please enjoy a few holiday hairstyle ideas from "Christmas past." These hairstyles would be cute for upcoming Christmas parties and the like.
Click the links below to go to the original posts with instructions on each style:
Fancy Holiday Braid With Beads
Elastic Christmas Tree Hairstyle
Candy Cane Stripe Ribbon Braid Ponytail Hairstyle
Christmas Ribbon Cornrows
Candy Cane Half Up Hairstyle With Ribbon
It's fun for me to browse through our older posts sometimes. It's crazy how much our Princess has grown up and how much our blog has changed over the years!
We also recently posted a tutorial for an elegant updo (shown below) if you are wanting more of a formal look. If you have not seen this one yet, the video tutorial can be found at the following link: Holiday updo.
We want to wish you all a very Merry Christmas (or any other holiday you may celebrate) and hope you enjoy this season with your family and friends!
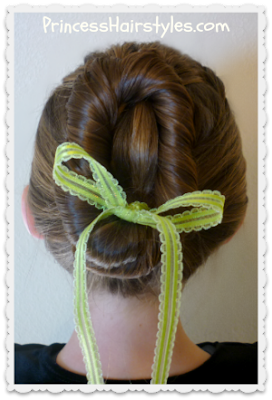
Holiday Hairstyles, Swirling Braids Updo
An elegant updo!
Pretty Christmas hairstyle, New Years Eve hairstyle (or any other special occasion up-style.)
With the holiday season in full swing, we wanted to share a fancy updo that may work for all of the fun holiday parties and events you might be attending this year! We are both very happy with how this "swirling braids updo" turned out, as it looks quite intricate but is actually pretty easy to do!
Of course, this hairstyle doesn't have to be just for the holidays. This braided updo would be lovely for many events such as: The Prom, Homecoming, Recitals, Communions, Weddings, Brides, Flower Girls... any special occasion really.
We choose to go with a tidy and sleek look this time. You could definitely make this style more soft and messy looking if you prefer. Curling her hair before you start (or if you have naturally curly hair) would add some cute texture for more of a bohemian look. Also, you could always leave some hair out around her face to soften things up a bit.
Hairstyling supplies needed to create this updo:
- 1 clear elastic
- Several bobby pins
- 3-4 clips or hair ties to help keep her hair sectioned while you braid
- Comb
- Hairspray or gel (optional)
This hairstyle will work best with long hair or medium hair. To complete this look, you will need to know how to french braid and how to french twist braid (as shown in our video above.)
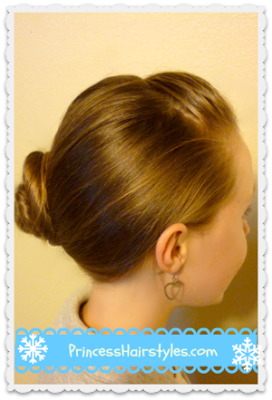
Elsa Hairstyle Tutorial Inspired By Disney (Frozen)
The twist and bun updo hairstyle Elsa was wearing at the coronation in the Disney movie "Frozen."
Since posting Anna's hairstyle (from the movie Frozen) last week, we have had over 100 requests to do a tutorial for Elsa's coronation hairstyle! We weren't really planning on doing any other "Frozen hairstyles," but how could we ignore that? ;)
Besides, with the holidays right around the corner, I think this would make a lovely hairstyle for Christmas, New Years Eve, or any other holiday occasion that may be celebrated this time of year. This style is simple, elegant, and classic... don't you think?
Keep in mind, there are several different ways you could go about creating this updo. We first tried placing a headband over her head and tucked the hair around it to form the twist. Then we tried making a "French twist" along the side... which actually turned out very true to the original style, but was quite difficult and required tons of bobby pins. We also tried a French fishtail, which looked cool, but not quite right! We finally settled on this simple twist (shown in our tutorial below) because we wanted something that was quick and easy to create for everyone. Although it did not turn out exactly like the original style, I think it is close enough. If you have blonde hair and bangs as well as a tiara or crown, you could really make this look authentic!
Elsa's Coronation Hairstyle Video Tutorial:
Frozen Hairstyles, Anna Coronation Bun
A hairstyle tutorial inspired by the Disney movie "Frozen." This is our take on the bun and braid Anna was wearing at the coronation ceremony.
How many of you have seen Disney's latest animated movie (Frozen?) We watched it over this past Thanksgiving weekend and loved it. Of course, beyond the cute story, I couldn't help but notice all of the adorable hairstyles throughout! This particular hairstyle (on Anna) was my daughter's favorite. And since "our Princess" has pretty much the same reddish brown hair color and length as Anna, we just had to try and re-create this bun!
Trying to create a hairstyle that was originally drawn for an animated character can sometimes be quite challenging. Human hair tends to have a few more issues than cartoon hair. ;) So, keeping that in mind... this is obviously not an exact replica of the original style, but just our interpretation. Also, Anna has bangs (or fringe) and "our Princess" does not. If you have bangs, all the better for this particular style! I think my favorite part of this hairstyle is the darling braided headband placed directly behind her bangs. Super cute.
Anna's Frozen Hairstyle Video Tutorial:
I was waiting for a good view of the back of her bun the entire time I was watching the movie and there were a couple of good shots. But of course, I couldn't find a picture of the back of the hairstyle online. So, I kind of had to go off of memory. There are also many different ways you could go about creating the bun and depending on the length of hair you are working with, you may want to change things up a bit. For example, if you are working with layered hair, you might have more luck with a rope braid instead of simply twisting the hair like we did. And, if your hair is just too short to wrap up in a circular shape, you could really just create a standard bun instead. Whatever works, right?
The main character Elsa (Anna's sister) also wore several cute hairstyles in the movie. I noticed an elegant twist updo at one point, as well as a darling French braid. Disney really did a great job with the braids and hairstyles in this movie!
Braid Tutorial - Cinch Knot Feather Braid Hairstyle
2 Cute Hairstyles Using Braids & Knots!
Today's braiding tutorial is a combination of several techniques. We have combined a French "feather braid" and one of our old favorites (the spiral knot braid) to create this fun "cinch knot feather braid."
In our video below, we show how to make this unique braid. Of course, after you know how to do that, there are endless hairstyles that can be created! As demonstrated in our photos above: A diagonal French braid with the knot on top, and pigtail French braids with the knots running along opposite sides of the braid (both facing the center part.) You could also feather both sides of the braid and created a knot along each side if you want to. See what I mean? Endless possibilities!
Cinch Knot Feather Braid Video Tutorial:
You may have noticed that I braided her hair while it was damp/wet in this tutorial. Depending on the texture of hair you are working with, this may not be the best solution for you. The Princess's hair is naturally very straight and fine. When we do knotted hairstyles, I have found that it saves us a lot of trouble and time to start with wet hair to help control flyaways. I usually will finish it off with some hairspray and the style will stay smooth looking all day when we do this. Of course, if you would rather braid the hair dry, you can always use pomade/gel/wax while making the knots instead of water to help keep things smooth. One thing to keep in mind if you choose to work with the hair while it is wet: You will want to be very careful not to pull the braid too tight, or comb/handle the hair roughly. Hair is more fragile while wet and can break easily. Also, if you have hair that tangles easily, I would not recommend wet braiding.
We would love to see any hairstyles you guys create using this braid! Feel free to share your pictures on our facebook page or on Instagram. If you use Instagram, be sure to tag us @hair4myprincess and use the hashtag #hair4myprincess so that we can find it. ;)
Criss Cross French Braids Hairstyle
How To Make French Braid Pigtails, With Twist Accents
FYI, we actually filmed this cute braided hairstyle over the summer (notice her fun sun dress/swimsuit cover up.) We were headed to the lake the day we did this one. Sadly we won't we seeing much warm weather (or the lake) for awhile around here. Fall/Winter is now upon us!
But, whatever the season, these criss cross rope braid accents are a fun way to spice up some plain old classic French braid pigtails.
As long as you know how to French braid, this style is not difficult and actually does not take up much more time than standard French braid pigtails. It really is a quick and easy hairstyle. We choose rope braids (or twist braids) for our braided accents. Of course, you can do any type of braid you want. This style can also be done with Dutch braid pigtails (instead of French braids if you prefer.) As shown in our video tutorial below, there are also several different designs you can make with the accent braids (depending on the length of hair you are working with.)
Supplies Needed:
- 4 small hair elastics
- Comb
- Finishing hair spray or gel (optional)
Criss Cross French Braids Video Tutorial:
Criss Cross Twists - Half Up Hairstyle
A Cute And Easy Half Up, Half Down Hairstyle
Our hairstyle today is very quick and simple. Perfect for those days when you really don't have time for anything complicated, but still want to look cute. This half up style is casual, but also elegant at the same time. I would call it... bohemian chic. ;)We have had a few requests to do some hairstyles for wavy or curly hair. This style should work with most hair textures (curly, wavy, or straight) and most hair lengths (long hair, medium hair, and even fairly short hair.)
As shown in our video tutorial below: To create these beachy waves on The Princess, we braided her hair while it was damp and left the braids in overnight. Of course, you could also use a curling iron, curling wand, waver, or other curling method to achieve similar results. Whatever floats your boat!
We are loving the criss cross woven pattern of these twists in her hair. So pretty. As you can see, I chose to place the twists slightly at a diagonal angle for something different. If you prefer things more uniform, you could place them centered on her head. This is the fun thing about hairstyling.... hairstyles are like snowflakes in that no two styles ever come out exactly the same!
Supplies Needed:
- Several small, clear (or similar to your hair color) elastics. The Brand we use is "Goody Ouchless." You can use bobby pins instead if you prefer, but I have found that they don't stay in as well with my daughter's fine hair.
- A decorative clip, bow, or flower, to finish off the style (optional.)
- Hairspray or gel (optional)
Half Up Hairstyle - Video Tutorial:
Suspended Fishtail Braided Hairstyle
The Ever Popular Fishtail Braid, With A Twist
I think it is safe to say, the fishtail braid (or fishbone/herringbone braid) has probably been our favorite braid of 2013. Our Princess has been wearing it (or a variation of it) to school at least once per week!Today's hairstyle tutorial shows a fun and cute way to add some extra style to this classic braid.
This cute hairstyle has been great for the princess to wear to school. Sometimes when she wears a standard braid at the base of her neck, the hair around her face tends to fall out throughout the day as she is playing at recess and such. As an added bonus, this style seems to help with that problem (as the hair on the sides of her head is tied back and less likely to escape.)
The Princess and I had a hard time coming up with a name for this style. So we asked the Princess's dad what he thought, and HE actually came up with "The suspended fishtail!" We decided this hairstyle also looks sort of like a hair bow, bow tie, or an upside down V, but in the end... the suspended fishtail won out. ;)
Hairstyling supplies needed to create this look:
- Comb or brush
- Several small, clear elastics (or close to the color of hair you are working with.)
- Hairspray or gel (optional)
- Medium length or long hair
Suspended Fishtail Braid Video Tutorial: Click here to watch the tutorial directly on YouTube.
If you have ever created a fishtail braid, you know that they can be kind of time consuming (since you are taking such tiny strands.) If you don't have time for a fishtail, you could always end this style in a regular 3 strand braid, rope braid, 4 strand... whatever you want!
13 Halloween Hairstyles
Have you decided on a Halloween costume this year? We wanted to share a few of our favorite Halloween Hairstyles with you today (just in case you are looking for some last minute ideas.) We had a great time going through our archives to find these 13 styles. I'm guessing (unless you've been following our blog since the beginning of time) some of these hair styles will be "new" to you.
Please enjoy our quick Halloween Hairstyles collection video below. The links for all of the tutorials can be found inside the video itself, or right here underneath the video.
Click the following links to go directly to the tutorials:
Princess Crown Made From Hair
Disney Princess Jasmine Hairstyle
Fancy Princess Updo
Princess Bun With Beads
Inspired By Rapunzel Hairstyle (Ribbon Braid)
Disney Princess Belle Hairstyle
Spider Hairstyle
Spider Web Hairstyle
Princess Headband With Jewels
Candy Corn Hairstyle
Cupcake Pigtails
Taylor Swift Hairstyle
Cinderella Hairstyle (would also work for Tinkerbell)
Happy Halloween!!
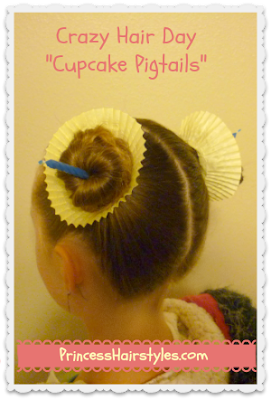
Crazy Hair Day Hairstyle!
"Cupcake Pigtails"
We weren't planning on making a tutorial today. But this hairstyle turned out pretty cute, so I decided to share this quick "crazy hair" idea with you.
This was one of those last minute things. You know when your child tells you it's crazy hair day (the morning of) and you get to whip something up in 5 minutes? Yeah, that's one of the fun things about being a mom! This hairstyle should work great for a time like that..... as we tested it for you this morning. :)
Step by step instructions:
1. Make a set of pigtails.
2. Take 2 cupcake liners and cut a hole in the bottom of each one with a pair of scissors.
3. Twist up the hair in the pigtails (to hold the hair together) and thread the ends through the holes in the cupcake liners (one at a time.)
4. Push the liners up to the top of the pigtails on each side.
5. Wrap the hair up into buns inside the liners, and secure with clear elastics. You can make any type of bun you want. She wanted this to look like "swirled frosting" so I took the hair, twisted it, and wrapped it around itself.
6. (Optional) Decorate your "cupcakes." We stuck a candle through the center of each of the buns for a birthday cupcake look. You could also add glitter, "colored frosting" (hair chalk or spray,) a cherry... whatever you want!
We would love to hear your crazy hair ideas in the comments. Or, if you have pictures of styles you have done in the past, please feel free to share them on our facebook page! It is always fun to see what you guys come up with.
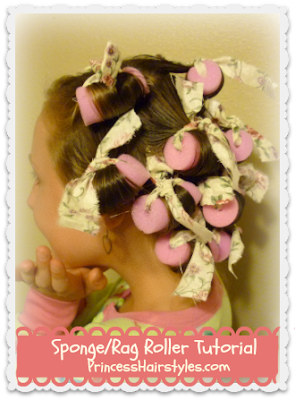
No Heat Curls Tutorial, DIY Sponge Rag Rollers
Heatless Curls, Overnight.
So Comfortable To Sleep In!
Although I would love to take credit for this amazing idea.... I am not the creative genius behind these sponge rag rollers. This is a (gasp) copied design! I first saw this idea on Pinterest (where else?) which led me to a very fun blog called The Mother Huddle, which you should definitely check out! So Comfortable To Sleep In!
I'm typically not really much of a crafter, but this is one of those projects that I could not pass up. No sewing or gluing involved, very quick and easy, fairly inexpensive, and a great end result. These heatless curlers needed to happen, and needed to be shared!
We have always loved the overnight curls created by using standard sponge (or foam) rollers. I remember wearing these when I was a little girl, so they have been around for a long time! But "The Princess" doesn't particularly enjoy sleeping in them because the plastic clamps (which hold the curler to your head) typically end up poking her during the night. We have also had problems with her long hair getting snagged and tangled around the edges and hinges of these rollers, which can turn into a nightmare when it is time to take them out. And, as much as I love classic "rag curls" (as they are comfortable to sleep in) rag curls are not my favorite curling method because sometimes the curls can end up being very tight and frizzy looking.
These sponge rag rollers really do make awesome, smooth, uniform curls (as shown below) with no discomfort while you are sleeping, or snags while taking them out!
Supplies Needed:
* Foam/sponge rollers. We opted for the largest size of sponge rollers we could find, as we wanted soft, loose, and bouncy curls this time. You can definitely purchase smaller rollers if you prefer tighter curls. The ones we ended up buying are made by "Conair" and I noticed at least 3 different sizes available and several other brands while we were looking. Of course it will depend on your hair texture and length, but we used 15 rollers total.
*Scissors
*Scrap fabric. If you have an old pillowcase, that will work great!
*Something to push the fabric through the rollers. We used a plastic craft needle (which can be found in most craft stores.)
Enjoy our video tutorial below, as the princess herself teaches how to make these rollers!
These curls are going to come out a little bit different depending on how you wrap them up. We chose to wrap them horizontally this time, which creates more of a tousled, natural looking curl. You could wrap them vertically instead for more of a spiral look.
A fun little side note: I asked the princess how these were to sleep in and she told me it felt like she was wearing soft little pillows all over her head, which cradled her to sleep. ;)
Candy Corn Hairstyle For Fall
An "Elastic Web" Hairstyle Inspired By Candy Corn! Cute Hair Style For Halloween, Thanksgiving, & Fall In General.
Some of you may remember the "candy corn style" we posted several years ago on our Princess? This has been one of our all time favorite hairstyles for Fall and I feel bad that we never made a video tutorial. So, this is a remake for all of our YouTubers. This hairstyle is great because it works with short hair, thin hair, thick hair, medium hair, and of course, long hair. Pretty much any hair texture or length (and as you can see, even toddler hair.) This is also a very easy hairstyle to complete with no braiding skills required!
When we first did this style on the princess, we left her hair down and added some curls. This time (on the pea) we chose to pull the rest of her hair into a side ponytail with a messy bun. I love the look of the "candy corn" laying on the side of her head, but if you prefer, you could definitely start the first row along the front (bringing the design straight back to the middle of her head.)
Supplies Needed:
Quite a few miniature, mulit-colored rubber bands (the amount will depend on how many rows of elastics you choose to make.) We purchased ours at Walmart and the brand we prefer is "Goody Ouchless." We used orange and yellow bands this time. Of course, you could add in white or brown as well if you want, as candy corns come in several different varieties. ;)
Candy Corn Hairstyle Video Tutorial:
(Be sure to watch the end of this video for a fun clip of "The Pea!"
I realize that many of our Halloween hair ideas are fun, but might be considered rather obnoxious for certain occasions (for example the spider bun!) But, I think this candy corn style is subtle enough that it could look nice even for church or school. Most people would probably not even realize it is supposed to be a candy corn and just think it is a cute hairstyle!
Halloween Hairstyles
Princess Crown Hairstyle
Today's tutorial is literally a hairstyle for a princess. A crown (or tiara) made from hair!
We've been so excited for Fall to come around again. At our house, this means Halloween decorations, treats, pumpkins, fall leaves, cooler weather, costumes, and of course... Halloween hair!We're guessing that some of you may be planning to dress up as some type of princess for Halloween this year? Instead of buying a crown to go with your costume, what about making one out of your own hair? The best part, this crown won't get lost or broken, it won't get tangled up in your hair, and your head won't be poked with those awful plastic prongs all night long while trick or treating. ;)
We thought about (and tried) several different methods for creating a crown of hair and finally settled on this one. Some of the ideas we came up with involved french braiding, and others would require wire or pipe cleaners to help the hair hold its shape. We really love this simple crown because you don't need to know how to french braid to make it, it is quite easy, and the only supplies you will need are a couple of bobby pins and one elastic. Of course if you want to, you could add some glitter to your hair to make the crown sparkle!
As you may have noticed, my daughter has quite long hair. If your hair is on the shorter side, you could still use this basic idea but you may need to modify it a bit. You could also turn this into an updo or add some curls (depending on the look you are going for.)
Princess Crown Hairstyle Tutorial:
This Halloween Hairstyle would work with many costumes beyond the "classic princess hairstyle." For example: A Fairy, any of the Disney Princess's (Belle, Sleeping Beauty, Cinderella, Merida, Snow White, Ariel, Sofia, etc.) A Bride, Queen, Witch, Beauty Queen, Miss America, Prom/Homecoming Queen.... the list could go on and on!
We do have a few more Halloween Hairstyles ideas (click the link) if you are still looking for the perfect hairdo.
Lace Braid Rose Hairstyle For Long Hair
An Elegant Braided Updo Featuring Braided Roses
If you follow us on Facebook you may have seen a photo of this hairstyle (which was actually done on a mannequin head) posted last week. We have noticed this beautiful hairstyle floating around on Pinterest, and Instagram quite a bit lately. We have also received several requests, so I thought we would give it a try!
This hairstyle is really not that complicated as long as you know how to lace braid, although it is a little more time consuming than some of the styles we have done. You will probably need to give yourself 15-20 minutes to complete all of the braiding and pinning. Since this hair style is so lovely, romantic, beautiful, and feminine, I would say the extra time is definitely worth it! Anytime I see braided flowers (or roses/rosettes) in someone's hair, it always looks so pretty. You really can't go wrong with braided roses!
I'm thinking this style would be great for many special occasions such as: a wedding, flower girl, prom, homecoming, church, recital, communion.... you get the idea!
Supplies Needed:
- 2 small clear elastics
- 1 medium sized clear elastic
- 2 clips or cloth covered elastics to temporarily hold the ends of the braids
- Several bobby pins (we used miniature bobby pins from Sally Beauty Supply.)
- Comb or brush
- Hair spray (optional)
- Fairly long hair
Please feel free to share this style using the buttons below if you loved it. ;)
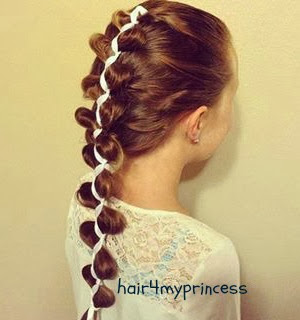
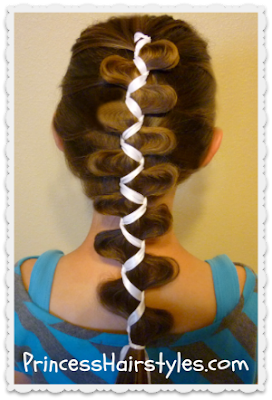
French (Dutch) Loony Ribbon Braid, Cute Hairstyles
A Unique French Braid With Ribbon
The basic concept of this braid was inspired by our friends over at CuteGirlsHairstyles who posted a "ribbon accented loony braid" done in a low side ponytail. We thought the braid was so adorable and wondered if it could be done as a French braid or Dutch braid. After some trial and error, we were finally able to make it work. And, we love how it turned out. This is one of those fun styles that will attract lots of attention, comments, and compliments! This braid looks quite unique with the ribbon zig zagging down the middle, yes? This braid reminds me so much of a hairstyle Rapunzel would wear!
I would say that at first glance this braid looks like a Dutch braid (meaning the outside strands would be coming in under the middle strand) but surprisingly, it is actually a French braid. I'm thinking this is the reason so many of you have been asking for a tutorial. This braid is kind of deceiving to try and figure out how it was done just by looking at it. We actually tried using a Dutch braid first, and it didn't turn out quite right. Also, as you will see in our video tutorial below, stretching out the strands is probably the most difficult part of this braid (since you will need to be careful where you are grabbing.) ;)
Supplies needed:
- 1 small elastic
- 4-7 ft long length of ribbon (or you could use 2 shorter strands and tie them together)
- comb or brush
French Loony Ribbon Braid Video Tutorial
As another option, you could substitute the ribbon for 2 microbraids (as shown below.)
Subscribe to:
Posts (Atom)


