Crazy Hair Day
Showing posts with label Crazy Hair Day. Show all posts
Showing posts with label Crazy Hair Day. Show all posts
2 Spooky Spider Hairstyles For Halloween
Today we are sharing 2 fun hairstyles for Halloween! These Halloween hairstyles are some of our favorite spooky styles from the past that you may not have seen on our blog, or might have forgotten.
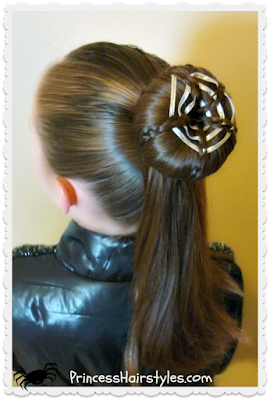
1. The spider web bun.
2. The spider bun hairstyle.
Both of these styles would be great for Halloween parties, school, trick or treating, the month of October, to go with your Halloween costume, or for Crazy Hair Day!
Spider Hairstyles, Video Tutorials: (Click here to watch the video directly on YouTube.)
Supplies needed to recreate these hairstyles:
*Braided spider bun - Pipe cleaners, squiggly eyes and spider head pom pom (glued to a bobby pin.) Several hair elastics or hair ties.
*Spider Web Bun- Hair donut or bun maker, ribbon or yarn, sewing needle, hair elastics or hair ties.
What are you dressing up as for Halloween? Do you have your costume yet?
Easy Spider Web Hairstyle
Oh no! A spider has spun a web in her hair! ;)
Hey guys! We love Halloween and look forward to posting Halloween hairstyles each October. This year we wanted a spiderweb hairstyle that would work for teenagers as well as little girls. You could even wear this style to school or work without being too obnoxious. Without the plastic spider, this hairstyle would be cute all year round!
Easy Spider Web Hairstyle, Video Tutorial: (Click here to watch the video directly on YouTube.)
This Halloween hairstyle is created by using a series of waterfall twist braids. We love that it only takes a few minutes to spin these braids into a spider web hairstyle. And the best part... only one elastic to take out when you are done!
Supplies needed to recreate this spider hairstyle:
- 1 medium size hair elastic
- Plastic spider (optional.) We have found that spider rings work great!
- Temporary clip to hold the braids while you are working.
- Hair product to help control flyaways.
Looking for more Halloween hair ideas? Browse through our Halloween Hairstyles featuring several more spider hairstyles, candy corn hairstyles, Disney Princess hairstyles, a unicorn hairstyle, trolls hair, wonder woman hairstyle, etc.
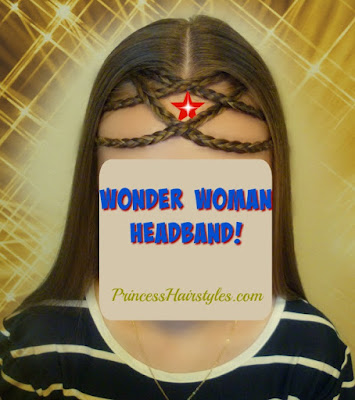
Wonder Woman hairstyle tutorial! DIY Braided Headpiece, Halloween Hair
You'll love this Wonder Woman hairstyle featuring a DIY headpiece made from your own hair! A perfect Halloween hairstyle to go with your Wonder Woman costume. And the best part? You will not need to purchase or make a wonder woman headband or crown to complete your look. Our tutorial today shows how to create a wonder woman headband using 4 cornrow braids and an inexpensive red or gold star sticker. This warrior braid / super hero hairstyle is edgy, unique, and fierce. So fun!
Wonder Woman Hairstyle, Braided Headband Video Tutorial: (Click here to watch the video directly on YouTube.)
As mentioned in our wonder woman hair tutorial (above) we would suggest adding large, voluminous curls to complete your wonder woman Halloween costume and hairstyle. We have a tutorial showing how to curl hair with a curling wand that would work great. I would suggest using a large barrel for loose, bouncy curls.
Supplies needed to recreate this Wonder Woman inspired headpiece:
- Several small, clear hair elastics.
- Sectioning clips (alligator clips or claw clips) to help keep hair out of your way while braiding.
- A gold or red star sticker.
- Pomade, gel, hairspray, etc. to help control flyaways.
Hope you enjoyed our Wonder Woman hairstyle tutorial. Happy Halloween!
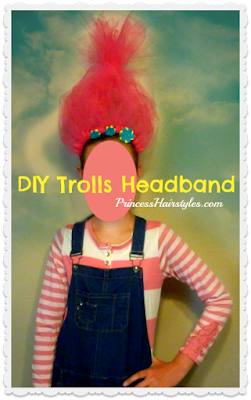
Trolls Headband Tutorial & Easy DIY Halloween Costume
Since Halloween is right around the corner, this week we are showing a fun DIY "Halloween hairstyle" and Trolls costume idea! We are loving how easy and quick this "no sew" Trolls headband is to make. Your finished Trolls hairstyle could be worn to school for a Halloween party, crazy hair day, a Halloween dance, a trip to the pumpkin patch, Oktoberfest, as part of a costume for trick or treating, dress up, or to watch the new Trolls movie featuring Anna Kendrick (Poppy) and Justin Timberlake. We have seen these cute headbands all over Pinterest and Etsy and thought they were such a great idea! We love that you could dress up as a troll without having to wear a hot, itchy, and uncomfortable wig!
Trolls Headband Video Tutorial: (Click here to watch the video directly on YouTube.)
Supplies Needed To Create Your Own Troll Hair:
- Around 5 yards of tulle (cut into 6x24 inch strips.) As mentioned in our video tutorial (above) stiffer tulle will work best and don't worry about getting your strips cut perfectly. You can use any color you want and can even mix colors if you desire multi colored hair or even rainbow hair.
- 1 headband
- 1 medium size, clear elastic
- Scissors
- Decorative flowers, ribbons, or other accessories (optional)
- Hot glue gun
For more Halloween hair and DIY costume ideas, check out our our Halloween Hairstyles Collection. (Including Disney Princess Hairstyles... Belle, Jasmine, Cinderella, Elsa, Anna, a genie, pirate, unicorn, spider hairstyles, and more.)
Topsy Tail Bubble Faux Hawk Tutorial, Dance Hairstyles
We hope you love this easy bubble faux hawk! This hairstyle would be great for dance, cheer leading, gymnastics, sports, figure skating, school, Prom, church, etc.
My daughter is on a dance team and wears a faux hawk hairstyle regularly to competitions, so we have tried several different ways of creating this edgy look. If you are looking for more dance hairstyle ideas, we actually have a past tutorial showing how to create a "messy bun faux hawk" as well as a "braided faux hawk with cornrow accents."
We are loving this topsy tail method since it is easy and fairly quick!
Topsy Tail Faux Hawk Video Tutorial: (Click here to watch the video directly on YouTube.)
Over the years we have seen several variations of this trendy faux hawk hairstyle made using a topsy tail and have been wanting to try it. A few of the hairstylists we were inspired by for this tutorial are listed below:
Confessions of a Hairstylist
styles_n_smiles
Two Little Girls Hairstyles
Annies Forget Me Knots
Supplies needed to recreate this hairstyle:
- Several medium size hair elastics (the amount will depend on how many bubbled sections you plan to make in your faux hawk.
- If you plan on using this hairstyle for dancing, sports (or anything active) I would suggest adding bobby pins to each looped section to help keep the style secure.
- Topsy Tail. If you are needing a topsy tail (as shown in our tutorial) they can be found on Amazon (affiliate.)
- You may have noticed that I styled her hair while it was damp in this video to achieve a smooth and sleek look on the sides of the style. Depending on the texture of hair you are working with, it may work out better for you to style the hair dry using hair product to smooth the sides.
Halloween Hairstyles - Tangled Weave Spider Web Ponytail
Hey guys. This week we are adding one more fun Halloween hairstyle tutorial to our collection before October is gone! We recently went through our archives on our website (Princess Hairstyles) and found this spider web ponytail that we originally posted way back in 2008 as a pictorial. We remembered this woven spider web as being one of my daughter's favorites back then.... and she says she still remembers receiving tons of comments and compliments on this hairstyle when she wore it to a school Halloween carnival 8 years ago while she was in Kindergarten! Of course, we decided we needed to share this spooky hairstyle in an updated video tutorial for you today.
Tangled Weave Spider Web Ponytail Video Tutorial (Click here to watch the video directly on YouTube.)
We are loving the intricate webbing design created around the ponytail with these woven twists. As mentioned in our video, you could add a bun instead of the ponytail if you prefer, and bring the weaving all the way around her head in a full circle, just like a real spider web!
We added a cute spider bow (which was given to us years ago) to our finished design. Of course, this is optional but a spider accessory of some kind would make the perfect finishing touch to this hairstyle.
Supplies needed to recreate this spider web hairstyle:
- Several small, clear elastics.
- 1 medium size hair tie or ponytail holder.
- Several claw clips
- A spider accessory to add to your finished web (optional.)
P.S. Although this hairstyle is fairly easy and requires no braiding skills at all... it can be time consuming. I would give yourself 20-30 minutes to complete.
Spider Web Bun Hairstyle Tutorial
This week we are showing another fun Halloween Hairstyle and this one might be our favorite so far! We are loving this spider web bun / ponytail since it looks festive for Halloween, but isn't too over the top or crazy for teens, or even adults. This spooky Halloween spiderweb hairstyle could be worn to school, for a Halloween party, a Halloween dance, a trip to the pumpkin patch, Oktoberfest, or as part of a costume for trick or treating.
Spider Web Bun, Video Tutorial: Click here to watch the video directly on YouTube.
Supplies needed to recreate this spider web hairstyle:
- We purchased the silver ribbon used to make our webbing at a local craft store. You can use any color or type that you want. We have found that thinner ribbon works best for this style. You could also use yarn or string if you prefer (which may lay flatter and be easier to sew in.)
- The donut bun maker we used can be found in most stores that carry beauty supplies. You can also find them online (affiliate.)
- We purchased the plastic craft needle (shown in our tutorial above) at Walmart. You could also use a regular sewing needle.
- You will need 3 medium size hair elastics or hair ties to make the bun and several clips or temporary hair ties to hold your braids while you are working.
- Of course if you wanted to take this style a step further, you could add a spider accessory to your web! We have seen some plastic spider rings at the dollar store that would be perfect. ;)
Eyeball Bun Hairstyle For Halloween Or Crazy Hair Day!
Hey guys, we are back with another fun HALLOWEEN HAIRSTYLE or CRAZY HAIR DAY idea for you today! Depending on your Halloween costume, this eyeball bun would be perfect to go with a scary / creepy costume.... or with a funny / cute costume. I could see this hairstyle working with many creative and unique DIY costume ideas actually: A monster, zombie, witch, robot, alien, sea creature, swamp creature, etc. Or if you don't want to go "all out" dressing up, or aren't allowed to wear a full costume to school, you could just wear the eyeball bun by itself! We were thinking you could wear this bun and go as a "mom" because moms have eyes in the back of their heads, and those eyes would probably be bloodshot lol.
Eyeball Bun Hairstyle, Video Tutorial: (Click here to watch the video directly on YouTube.)
As shown in our tutorial, we started with a standard donut bun or sock bun, and it really doesn't matter how you make it, you just need a "roundish" bun to start with. We have several videos and different methods on our YouTube channel already showing how to make these buns. You can look at our donut bun playlist to see if there is one that would work for you.
Supplies needed to recreate this Halloween Hairstyle:
- We used the "perfect bun" tool (affiliate) to make our bun, which can be found online or in stores.
- You could also use a donut bun maker (affiliate.)
- 2 medium size hair elastics or hair ties.
- Several bobby pins
- Hairspray or gel
- We purchased our plastic eyeball and pipe cleaners at the dollar store, but I also found some online here: Plastic eyeballs (affiliate) and here: Pipe cleaners (affiliate.)
- Hot glue gun
Of course, if you would rather make 2 eyeballs on the back of your head, you could start with pigtails instead. Or, you could stack 2 buns vertically, like a faux hawk.
Happy trick or treating!
Unicorn Hairstyle For Halloween Or Crazy Hair Day
Since Halloween is right around the corner, for our hair tutorial this week we are sharing a fun unicorn hairstyle! This DIY unicorn horn could be used as a Halloween hairstyle, or for crazy hair day. Looking for a horn accessory to go with your "My Little Pony" or horse costume? Why not use your own hair?!
DIY Unicorn Hairstyle, Video Tutorial: (Click here to watch the video directly on YouTube.)
As mentioned in our video, you can make your "tail" sleek, or more voluminous. Curls, crimping, and teasing could add some extra texture if you are looking for more volume and lift. If you are wanting a colorful mane, tail, or horn, you could definitely add some temporary spray in hair color to go with your mystical creature look. As another fun option, if you would rather style a "mane" with your unicorn horn, you could make a series of messy buns, a pull-through braid, a french/dutch braid, curls, or faux hawk behind your horn instead of the ponytail.
In our video tutorial (above) we also show a great technique for wrapping hair around the top of your ponytail for a pretty every day look... when you aren't dressing up as a unicorn. Surprisingly enough though, recently we have actually seen a few unicorn hairstyles becoming sort of a "thing" in fashion magazines, tv shows, and around the internet. Maybe this will be the next big trend hahaha.
Supplies needed to recreate this look:
- 1 strong ponytail holder for the main ponytail. 1 medium size clear elastic. 1 temporary clip or hair tie to keep the hair sectioned while you are working.
- Several bobby pins. We used miniature bobby pins from Sally Beauty Supply (affiliate) which hold things tight extremely well.
- Small piece of card stock. (Approximately a 5 inch square.)
- Clear tape.
Butterfly Hairstyle
A cute hairstyle for spring!
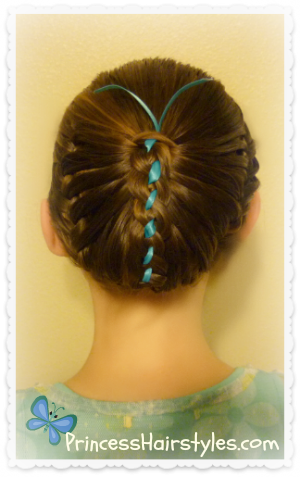
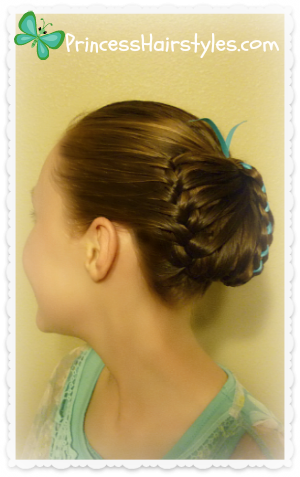
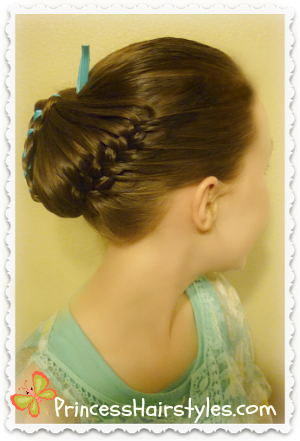
Our video this week is a highly requested tutorial for a cute braided butterfly hairstyle which we first saw on an Instagram account (pr3ttygirl79) a few weeks ago. You can see the original photo here. After reposting this fun spring style on our Instagram and Facebook pages, we had an overwhelming amount of requests for a tutorial. So, we decided to try and recreate it for you. I have to admit that our recreation did not turn out nearly as cute as the original! And I'm not exactly sure we did it the same way "pr3ttygirl79" did. But... an "A" for effort, right? ;) We had fun trying, and "the Princess" absolutely loved wearing this hairstyle. By the way, wouldn't this be a cute hairstyle for Easter?
This one is definitely an "attention getter.". You can be certain that wherever you wear this hairstyle, you will receive many compliments and inquiries about it. I love that although it is clearly a butterfly, it's not super "over the top" or obnoxious. Without the antennas, the bun itself is actually quite classic looking and beautifully elegant.
As shown in our video (below) we used part of the ribbon from our 4-strand braid to create the "antennas" for our butterfly. If you would rather use pipe cleaners or wire instead, feel free (and of course, if you don't want antennas in our hair, you don't have to add them at all.) Also, you can really use any type of braid you want for the center of the style. You can substitute the 4-strand for a 3-strand, fishtail, rope braid etc. It's up to you!
Supplies needed to recreate this hairstyle:
Butterfly Hairstyle Video Tutorial: (Click here to watch the video directly on YouTube.)
Our video this week is a highly requested tutorial for a cute braided butterfly hairstyle which we first saw on an Instagram account (pr3ttygirl79) a few weeks ago. You can see the original photo here. After reposting this fun spring style on our Instagram and Facebook pages, we had an overwhelming amount of requests for a tutorial. So, we decided to try and recreate it for you. I have to admit that our recreation did not turn out nearly as cute as the original! And I'm not exactly sure we did it the same way "pr3ttygirl79" did. But... an "A" for effort, right? ;) We had fun trying, and "the Princess" absolutely loved wearing this hairstyle. By the way, wouldn't this be a cute hairstyle for Easter?
This one is definitely an "attention getter.". You can be certain that wherever you wear this hairstyle, you will receive many compliments and inquiries about it. I love that although it is clearly a butterfly, it's not super "over the top" or obnoxious. Without the antennas, the bun itself is actually quite classic looking and beautifully elegant.
As shown in our video (below) we used part of the ribbon from our 4-strand braid to create the "antennas" for our butterfly. If you would rather use pipe cleaners or wire instead, feel free (and of course, if you don't want antennas in our hair, you don't have to add them at all.) Also, you can really use any type of braid you want for the center of the style. You can substitute the 4-strand for a 3-strand, fishtail, rope braid etc. It's up to you!
Supplies needed to recreate this hairstyle:
- 1 medium size elastic for the ponytail
- Ribbon (ours was approx. 2 feet long)
- 4 small, clear elastics
- Topsy Tail (optional)
- Several bobby pins
- Alligator or claw clips (temporary)
- Gel, pomade, or water for controlling flyaways (optional)
Butterfly Hairstyle Video Tutorial: (Click here to watch the video directly on YouTube.)
Pirate Girl Hairstyle, Halloween Hairstyles
ARrr Matey!
We have had many requests for quick and easy Halloween hairstyle tutorials this year, and today we are showing the second easy hairstyle in our "Halloween Hair series," the "Pirate Girl Hairstyle." (If you missed our first Halloween hairstyle from last week, click here to see a fun Genie Hairstyle.)
This style is very simple, easy, and cute. We like that you could change this style up to go as a pretty pirate, a scary pirate, or even as more of a gypsy character using this same concept!
We wanted her hair to be sort of tousled and natural looking, aka "Pirates of the Caribbean." So, to create the waves in her hair, I did a couple of French braids the night before. If you are going for more of a "pretty pirate" look, I would suggest a curling wand, curling iron, hot rollers, or other heatless curling method which creates more sleek looking curls.
Supplies Needed:
- A bandana, scarf, or square piece of fabric. (We purchased our bandana at Walmart for $1.) If you prefer, you could fold the bandana into a rectangular "headband" to go around her head, instead of tying it over her head like we did in the video below.
- You can add accessories such as feathers, beads, fabric, ribbons, etc. (depending on the look you are going for.)
- Earrings, a pirate costume or dress, and some fun makeup would complete this look for a super cute Pirate Halloween costume.
Pirate Hairstyle Video Tutorial: Click here to watch the video directly on YouTube.
Genie Hairstyle, Halloween Hairstyles
A fun genie ponytail and DIY headpiece
Now that October is here, we are super excited to kick off our Halloween Hairstyles tutorial series today with a cute genie hairstyle and DIY veil / headpiece! Anyone planning on being a Genie for Halloween?
Did you watch "I dream of Jeannie" back in the day? I sure did! You may remember that Jeannie wore her hair like this, but with a thick braid wrapped around the base of the ponytail (in front of the fabric ponytail holder.) You could easily add a braid to this style if you want more of an "I dream of Jeannie" look! If your hair is not long enough or thick enough to do that, I have also seen synthetic braided ponytail holders
This costume accessory and hairstyle could work for a "generic genie" as well as a Jasmine inspired Disney Princess costume. Of course, you can use any color of fabric you like. I would recommend finding fabric which is sheer and quite thin, as it will look more authentic and will lay nicer. ;) If you want to get creative, you can embellish this look by adding beads, glitter, sequins, or other fancy décor to your finished design!
This high ponytail hairstyle and "genie ponytail holder" are both super easy to make. No sewing is involved here, and the ponytail of course is nothing extravagant. Now all you need is a cute Genie costume to go with your hairstyle!
Supplies Needed:
- 1 strip of fabric, approximately 2 inches wide by 5 ft long
- 1 rectangle piece of fabric, approximately 2ft x 3ft
- Scissors
- 1 empty toilet paper (or paper towel) tube
- 2 small safety pins (or a hot glue gun)
- 1 hair elastic for the ponytail
- curling iron or wand (optional)
Genie Hairstyle and DIY Headpiece Video Tutorial: (Click here to watch the video directly on YouTube.)
Still looking for Halloween costume and hairstyle ideas? Click here to browse our Halloween Hairstyles playlist on YouTube which includes several Disney Princess hairstyles from Frozen (Elsa and Anna,) Aladdin, Beauty and the Beast, How To Train Your Dragon 2, and more!
Star Bun - 4th Of July Hairstyles
Another star shaped hairstyle!
For today's hair tutorial, we are creating a "star bun." This would be a cute and patriotic hairstyle for the 4th of July. I could also see this working as a "dance bun" for ballerinas & figure skaters.
This style is sort of a combination of our braided bubble bun and our star pigtails. We actually filmed this style quite awhile ago and have been waiting to post it for the 4th of July. Along with this star bun... we filmed another cute variation, which we are both in love with! So... watch for another fun and unique bun coming next week. ;)
As you may have guessed by looking at this style, we have used our Bun Maker
We have used regular 3 strand braids to create our star. Of course, you can use any type of braid or twist you want. I'm thinking rope braids would be a super cute variation.
Supplies needed:
- 2 hair elastics or hair ties
- several bobby pins
- a Bun Maker
or sock bun
- finishing hair spray (optional)
Star Bun Video Tutorial: Click here to watch the tutorial directly on YouTube.
P.S. If you are still trying to decide on a hairstyle for the 4th of July, we have several styles to look over here: 4th Of July Hairstyles
St. Patrick's Day Hairstyles, Shamrock With Ribbon
2 Fun Hairstyles For St. Patrick's Day!
We have seen many cute and creative shamrock & clover hairstyles around the web throughout the years, & we actually created a 3 leaf clover hairstyle for our blog way back in 2009 (before we started doing YouTube videos.) But, we realized that we have never made a video tutorial showing a shamrock hairstyle. So, we decided to add one to our St. Patricks Hairstyle collection this year!
There are realistically only so many ways a clover hairstyle can be constructed. But, the idea and basic concept we used to form these "clover leaves" actually stemmed from a Valentine's "heart hairstyle" on our blog via 2009. And then, we wanted to add some color (green of course) so we incorporated some ribbon around the leaves using the candy stripe method. You could also choose to braid the ribbon into her hair instead if you prefer.
Sad, but true... "The Princess" is growing up and starting to move away from "little girl hairstyles." As you will see in our video tutorial (and photo below) we have also included a more "grown up" St. Patrick's Day ponytail style (for those of you who aren't too excited about sporting a clover on your head, but still want to join in on the fun and not get pinched.) ;)
Supplies Needed:
- 3 lengths of green ribbon (around 12 inches each)
- 2 large hair elastics and 3 small hair elastics (preferably green!) The brand we usually use is called "Goody Ouchless."
- 6 clips/barrettes/hair ties to temporarily keep the ribbon from unraveling while you are working.
Football Hairstyle
A Hairstyle For Sports Fans!
Admittingly, I don't really follow Football that closely, but when Super Bowl season comes around, I can't help but get a little excited over all the hype. And, even if you don't necessarily like football.... how could you not like football hair!? :)
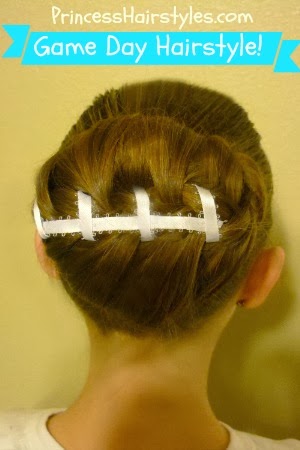
One day last week "the princess" was wearing the Braided Bubble Bun & for some reason, it totally reminded me of a football! Weird I know, but after that, I decided we had to give it a go. The Princess ended up loving the style! She wore it last night for the Seahawks vs 49ers, and is planning on wearing it on Super Bowl Sunday as well.
To create this football bun, I made a "braided bubble bun" (video tutorial below.) But instead of placing the extra hair (from the hair donut) on the right and left of the bun.... I placed it on the top and bottom of the bun and French Braided the hair horizontally (instead of vertically.) After the braiding was complete, I just took some ribbon and sewed in some laces over and around the braid. Super easy!
Braided Bubble Bun Video Tutorial: (Turn it into a football hairstyle by using the modifications above.)
I'm thinking this fun hairstyle would be super cute for crazy hair day or Halloween as well as cheerleading, or watching football!
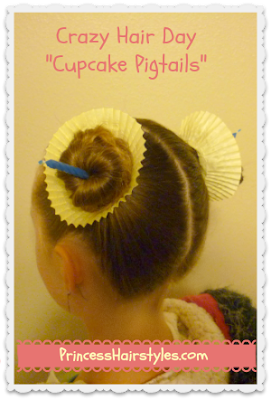
Crazy Hair Day Hairstyle!
"Cupcake Pigtails"
We weren't planning on making a tutorial today. But this hairstyle turned out pretty cute, so I decided to share this quick "crazy hair" idea with you.
This was one of those last minute things. You know when your child tells you it's crazy hair day (the morning of) and you get to whip something up in 5 minutes? Yeah, that's one of the fun things about being a mom! This hairstyle should work great for a time like that..... as we tested it for you this morning. :)
Step by step instructions:
1. Make a set of pigtails.
2. Take 2 cupcake liners and cut a hole in the bottom of each one with a pair of scissors.
3. Twist up the hair in the pigtails (to hold the hair together) and thread the ends through the holes in the cupcake liners (one at a time.)
4. Push the liners up to the top of the pigtails on each side.
5. Wrap the hair up into buns inside the liners, and secure with clear elastics. You can make any type of bun you want. She wanted this to look like "swirled frosting" so I took the hair, twisted it, and wrapped it around itself.
6. (Optional) Decorate your "cupcakes." We stuck a candle through the center of each of the buns for a birthday cupcake look. You could also add glitter, "colored frosting" (hair chalk or spray,) a cherry... whatever you want!
We would love to hear your crazy hair ideas in the comments. Or, if you have pictures of styles you have done in the past, please feel free to share them on our facebook page! It is always fun to see what you guys come up with.
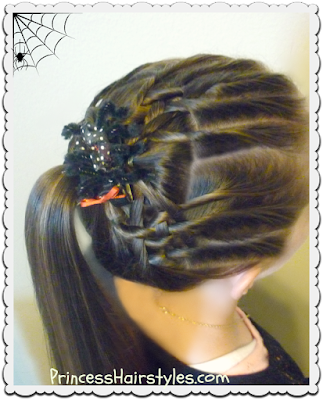
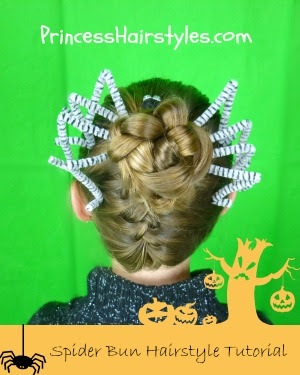
Halloween Hairstyles, Braided Spider Bun
A Spooky Spider Hairstyle!
This fun braided spider hairstyle would be great for Halloween, Trick or Treating, a Halloween party, or crazy hair day at school.
The basic idea for this spider hairdo came from one of our readers (Jill) who posted a picture of her little girl wearing a spider on her head on our facebook page a couple of years ago! The Princess and I have been anxiously awaiting for Halloween to come around again to give this creepy style a try.
This hair style would be cute all on it's own, or could go with several Halloween costume ideas (a witch, vampire, zombie, etc.)
Supplies needed:
- 4 pipe cleaners (which can be found in any craft store) to create the spider legs.
- 2-3 hair elastics.
- Several bobby pins.
- An optional scary spider face (which could be made many different ways.) We used a little pom pom and some googly eyes for ours.
If you don't know how to french braid, or want to make this style easier and quicker, you can skip the upside down french braid up the back of her head and just start the spider bun in a standard high ponytail.
Of course, this doesn't have to be just a hairstyle for Halloween. Without the extra legs and spider face, this turns out to be a lovely elegant updo that could be worn for many occasions! We love how the upside down french braid sort of blends right into the bun. We opted for a braided bun this time, but... a sock bun, messy bun, twisted bun (or any type of bun you like) can be substituted.
The Scary Halloween Hairstyle Tutorial: (Be sure to watch for a fun Halloween "surprise" towards the end of the video. ;) Click here to watch the video directly on YouTube.
P.S. We are trying some different lighting and background in this video (trying to improve the quality of our tutorials for you guys.) Let us know if you find this video to be more clear (better) or worse than our old set up. Thanks!
Subscribe to:
Posts (Atom)


