
4 Strand Braid
Showing posts with label 4 Strand Braid. Show all posts
Showing posts with label 4 Strand Braid. Show all posts
4 Strand Rosette Heart Hairstyle For Valentine's Day

Looking for Valentine's Day hairstyles? We have one more for you today! You'll love this romantic half up, half down 4 strand braid rosette heart hairstyle.
The basic technique and concept for creating this type of heart hairstyle (by wrapping the hair around 2 ponytails at the top of the heart) is nothing new and has been a popular Valentine's hairstyle over the past few years. We love this base style and thought it would be fun to try it with a 4 strand ribbon braid and love how it turned out! We thought the "swirls" at the top of the heart looked like little roses (or rosettes) and the ribbon really makes the heart "pop." You'll notice that we used fairly thick ribbon and made loose braids for "fluffy" looking roses and a pretty "lace like" heart shape. If you use thinner ribbon and braid tight, your heart will come out more distinct and uniform looking, which is also a beautiful variation.
4 Strand Rosette Heart Hairstyle, Video Tutorial: (Click here to watch the video directly on YouTube.)

My daughter was wearing braids the night before we filmed this hairstyle to create some no-heat waves and texture. This style would work great with straight hair, wavy hair, or curly hair. If your hair is shorter, you could make the buns at the top separately and then start a new braid beneath the bun on each side to form the rest of the heart.

Supplies needed to recreate this hairstyle:
- 3 small, clear hair elastics.
- Several bobby pins. We used miniature pins from Sally Beauty Supply (affiliate.) We have found that smaller pins are easier to hide in delicate styles like this.
- Ribbon. We used about 2 feet on each half of the heart.
Braided 4 Strand Slide Up Accent Hairstyle Tutorial

Viriyuemoon
Bebexo
Cute Girls Hairstyles
"The Princess" has worn the standard slide up braid quite often over the years and we love how intricate and beautiful it looks. We decided to try braiding the individual strands before sliding them up in this tutorial, for a different spin on the braid.... and we absolutely loved the end result! This braid looks so ornate to me, almost too pretty to be real hair. I think this has to be one of our new favorite styles.
She has been wearing this braid lately in many different hairstyles and has received so many compliments on it. This braid can be worn on its own (as shown) in a down hairstyle. Or, it can be used as an accent for many elegant updos, buns, and chignon styles. For more of a casual look, you could pin the braid back (as shown in our video) and then pull the rest of her hair into a side braid underneath. The other day "the princess" wore this braid with the rest of her hair in a fishtail, which was absolutely adorable.
Braided 4 Strand Slide Up Braid Video Tutorial: (Click here to watch the video directly on YouTube.)
A few more pictures of this fun and intricate braid....


Supplies needed to recreate this hairstyle:
- 4 temporary hair ties or clips to keep your braids from unraveling while you work.
- Pomade, gel, or water to help control flyaways (optional.)
- 1 small hair elastic for the bottom of the braid.
- Bobby pins or another small elastic to pin the braid back.
Side Swept Braided Scissor Waterfall Hairstyle

Our video tutorial this week is based on a hairstyle that has been on our "to do list" for quite awhile now. We have been seeing this "side swept" look all over Pinterest, Instagram, Facebook, etc. and of course, we had to give it a try! Several different variations of this style have been popular on social media recently, including a regular waterfall braid variation, as well as a waterfall twist.
And, ever since posting the "scissor waterfall braid" several months ago, we have been wanting to do a tutorial on a "braided scissor braid" using micro braids as well (which is a variation of the original "waterfall scissor braid" and is shown in our tutorial today.) So, we decided to combine the 2 techniques into one video, and the "side swept braided scissor waterfall" was born! I think this variation of the side swept look has to be my favorite of all the braids we have tried with this style so far! I love that this "braided scissor braid" looks really unique and intricate, even though it isn't all that complicated to do.

Depending on your outfit and how you style the braid; This hairstyle can be worn as a relaxed, effortless, casual, messy bohemian type of look. Or, as more of a special occasion, fancy, glamorous hairstyle. I could even see this working for Prom, Homecoming, Weddings, photos, etc..
As mentioned in our video below, we used some overnight Dutch braids to create our heatless waves/curls for the base of this style, as we wanted more of a textured look. You can leave your hair straight, or add curls from a curling wand/curing iron if you prefer.

And...We wanted to share a "front view" of this hairstyle for you, since it is sort of hard to completely see what is going on from the side of this one. ;)

Supplies needed to recreate this hairstyle:
- 4 temporary hair ties or clips to help keep the ends of the braids from unraveling while you work.
- 2 small, clear, hair elastics.
- We used overnight braids to create our curls/waves. But, you can use any curling method you desire if you want curls. (curling iron, curling wand, curlers, etc.)
- Finishing hairspray, pomade, gel, etc.
Side Swept Braided Scissor Waterfall Hairstyle Video Tutorial: Click here to watch the video directly on YouTube.
In the photos below, we did the "braided scissor waterfall" in more of a "standard" fashion, across the back of her head, using straight hair (to more fully show the details of this gorgeous braid.)


Butterfly Hairstyle
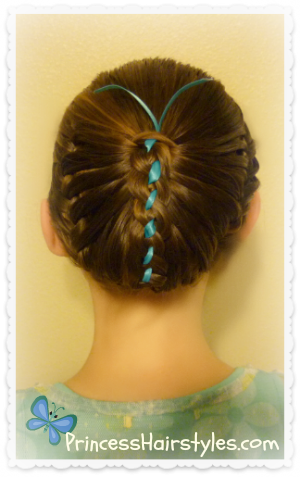
Our video this week is a highly requested tutorial for a cute braided butterfly hairstyle which we first saw on an Instagram account (pr3ttygirl79) a few weeks ago. You can see the original photo here. After reposting this fun spring style on our Instagram and Facebook pages, we had an overwhelming amount of requests for a tutorial. So, we decided to try and recreate it for you. I have to admit that our recreation did not turn out nearly as cute as the original! And I'm not exactly sure we did it the same way "pr3ttygirl79" did. But... an "A" for effort, right? ;) We had fun trying, and "the Princess" absolutely loved wearing this hairstyle. By the way, wouldn't this be a cute hairstyle for Easter?
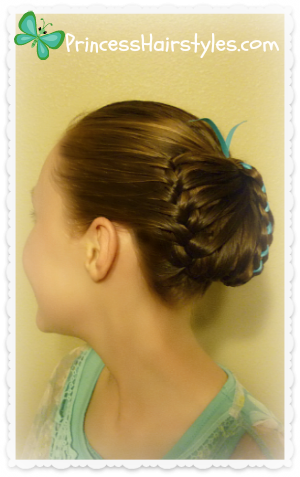
This one is definitely an "attention getter.". You can be certain that wherever you wear this hairstyle, you will receive many compliments and inquiries about it. I love that although it is clearly a butterfly, it's not super "over the top" or obnoxious. Without the antennas, the bun itself is actually quite classic looking and beautifully elegant.
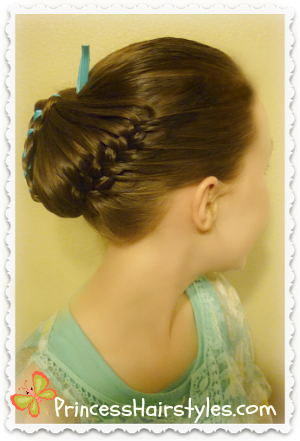
As shown in our video (below) we used part of the ribbon from our 4-strand braid to create the "antennas" for our butterfly. If you would rather use pipe cleaners or wire instead, feel free (and of course, if you don't want antennas in our hair, you don't have to add them at all.) Also, you can really use any type of braid you want for the center of the style. You can substitute the 4-strand for a 3-strand, fishtail, rope braid etc. It's up to you!
Supplies needed to recreate this hairstyle:
- 1 medium size elastic for the ponytail
- Ribbon (ours was approx. 2 feet long)
- 4 small, clear elastics
- Topsy Tail (optional)
- Several bobby pins
- Alligator or claw clips (temporary)
- Gel, pomade, or water for controlling flyaways (optional)
Butterfly Hairstyle Video Tutorial: (Click here to watch the video directly on YouTube.)
St. Patrick's Day Hairstyles, Braided Ribbon Headband and Clover

This week we wanted to put together a quick St. Patrick's Day hairstyle idea, since St. Patrick's is right around the corner. ;) This hairstyle is a spin off of a technique we posted a few years ago, the ribbon flower/clover. We think this ribbon "4 leaf clover" looks cute as an accent to the braided headband on this style.

Of course, this hairstyle can be used for other occasions besides just St. Patrick's Day. The green ribbon can be switched out for any color you want. And, instead of forming a clover or shamrock with the ribbon, you could actually just tie a regular bow instead.

We were trying to keep this hairstyle fairly simple and quick. But if you want to create the headband using a French braiding technique, you can definitely add in hair from the bangs area while you are braiding for a more intricate braid. Also, if the 4 strand braid is too difficult or time consuming for your liking, you can actually make this style using just a regular 3 strand braid (with the ribbon replacing one strand.)

Supplies Needed To Recreate This Hairstyle:
- 2 3ft (approx.) lengths of ribbon
- 1 small hair elastic
- temporary hair tie or clip
- scissors to trim the ribbon
If you are looking for St. Patty's Day hair ideas, we have a few more to choose from here: St Patricks Day Hairstyle Collection (Including a couple of shamrock hairstyles, a rainbow bun, and rainbow ponytail, as well as several hairstyles using green ribbon.
3 Heart Ponytails! Valentine's Day Hairstyles

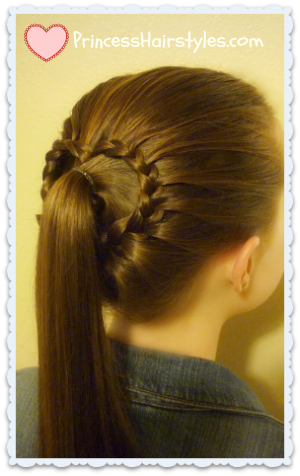
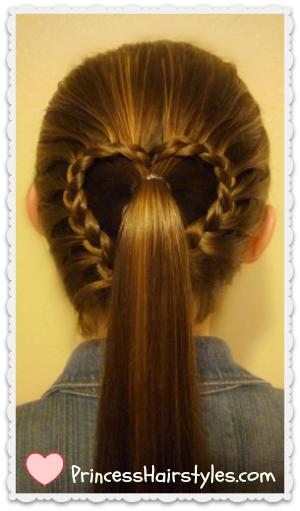
Today our Valentine's Hairstyle tutorial features 3 cute heart shaped hairstyles which all start out using the same technique. The basic concept and idea for these heart ponytails (& the original first ponytail shown in our video) was inspired by an awesome Instagram account called "Ice_Braids." We loved how simple and cute this ponytail looked when we first saw it, so we had to try it.... and we wanted to add a couple of variations of our own to the mix just for fun.
All three of these heart hairstyles would be cute for Valentine's Day, a flower girl, or any time you want to wear a heart in your hair. ;)
Hairstyle #1, The Braided Heart Ponytail. (Find step by step instructions for all 3 styles in our video tutorial below.)

Hairstyle #2, The Ruffle Braided Heart
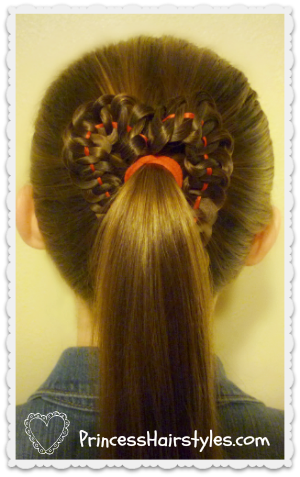

Hairstyle #3, The Lace Braid Heart Ponytail
Supplies needed to recreate these styles:
- Topsy Tail (The "topsy tail" shown in our video was purchased online and the brand is "Conair." If you are looking for one, you might try Ebay or Amazon. I have also seen them at Walgreens and Claire's occasionally.)
- Medium size elastic for the ponytail & small elastic to help hold the heart in place
- Ribbon (for hairstyle #2.) The ribbon we used is 1/4 inch and came on a roll in the Walmart craft section for around 50 cents.
- Bobby pins (optional)
3 Heart Ponytails Video Tutorial (Click here to watch the video directly on YouTube.)
Scissor Waterfall Braid & Fishtail Combo
A Cute Side Braid Hairstyle

Our tutorial today is showcasing another hairstyle idea featuring the "waterfall scissor braid."
If you did not see our video last week, we did a variation of this scissor braid (using rope braids) which ended up as a pretty "tie back waterfall hairstyle" linked here: Waterfall scissor twist braid.
As mentioned last week, we originally saw this new braid on the wonderful "Viriyuemoon's" Spanish YouTube channel and loved it so much, that we just had to sneak in one more style utilizing the braid this week!

There are so many different styles and variations that could be made using this braid, we had a hard time deciding what we wanted to do for this tutorial. We finally settled on a simple side fishtail with the scissor braid diagonally curving over the top.
I'm predicting the Princess will be wearing this hairstyle to school quite often (since this is fairly quick and stays in place quite nicely.) We noticed that having the hair run through the scissor braid before it is braided into the fishtail helped to hold any stray pieces from the side in place better than wearing a fishtail by itself. ;)
Depending on the look you are going for, of course you can make your fishtail braid more messy, full, and deconstructed looking... or leave it as is for more of a sleek looking plait.

Supplies needed:
- 1 hair elastic to tie off the end of the braid
- Pomade, wax, gel, or water to help prevent flyaways (optional)
Scissor Waterfall Braid and Fishtail Hairstyle Video Tutorial: Click here to watch the tutorial directly on YouTube.
Waterfall Braid, Scissor Twist Technique
A Waterfall Braid, With A Twist.... Or Two. ;)

This week, our hair tutorial (the "scissor twist waterfall braid") is a variation of a lovely braid we first saw on a Spanish YouTube channel ("ViriYueMoon") called the "waterfall scissor braid."
Our Princess has worn the original scissor braid several times and loves it! In the original version of this braid, regular strands of hair are used in the plaiting. We wondered what this unique braid would look like if we added some "twists" or rope braids in place of the regular strands, and we both ended up loving the outcome of this variation, so we wanted to share our results.

This tie back hairstyle has a similar look to a waterfall twist braid (or more accurately... a double waterfall twist braid with rope braided strands.) But as you can see in our video tutorial (below) this technique is quite different.

As shown towards the end of our video, you can choose to spread these twists apart to create a ladder braid type of effect (which is what we chose for our photographs here.). Or, keep the twists closer together for a completely different look. Also, we chose rope braids for our individual strands, but you can really use any type of braid you want.

We wanted to include a front view of this hairstyle. ;) The Princess doesn't have bangs, but we left some hair out of the braids around her face for a soft and feminine look. After the braiding was complete, we curled her hair using a curling wand.

Supplies Needed:
- Several "temporary" hair ties or clips to help hold the braids while you are working.
- 1 clear hair elastic (or an elastic which matches the color of hair you are working with.)
- Gel, pomade, finishing hairspray (optional.)
- Curling Iron, Wand, or similar (if you choose to add curls.)

Scissor Twist Waterfall Braid Video Tutorial (click here to watch the video directly on YouTube.)
In the picture below, we used the same technique shown in our video (above) but instead of using rope braids, we substituted regular 3 strand braids. Love how this turned out!

Centipede Braid Hairstyle Tutorial
A 4-Strand Fishtail Braid!

Our braiding tutorial today features a beautiful and intricate low side braid which was inspired by an Instagram photo we first saw on an account called "PrincessPunzelsHair."
This "centipede braid" is created by braiding 4 braids together (3 fishtail braids & 1 regular 3-strand braid) woven into a beautiful 4-strand pattern. If you are on Pinterest or Instagram, you probably remember seeing images of a similar variation of this braid (which was 3 fishtail braids braided together) as it went sort of viral in recent years. "The Princess" has worn the 3-strand version as well, and it is very pretty. But we love this 4-strand braid even more!

The only "complaint" I have with this braid, is that it does take awhile to complete. Most of the hairstyles we have shown on this blog are much quicker than they look and I rarely spend more than 5-10 minutes on The Princess's hair. But, that is not the case with this one. If you have made fishtail braids before.... you know what I am talking about. :) I would plan on a good 20 minutes to complete all of the braiding (especially if you are working with long hair.) With that said, I think the extra time spent is well worth it, since this braid is just so beautiful and intricate looking!

We chose to do a side braid for our video tutorial below, but this braid can be centered at the nape of the neck instead, or placed into a ponytail. You could also wrap the braid up into a pretty bun... but the pattern is just so gorgeous (and after spending all of that time braiding) I hate to cover it up and prefer to leave this one down to show it off!
Supplies Needed:
- 4 temporary hair ties (to hold the ends of the braids while you are working.)
- 1 clear elastic or hair tie.
- Gel, water, hair wax, or pomade (optional)
Centipede Braid Video Tutorial: Click here to watch the video directly on YouTube.
Cute Ponytail Hairstyle, The Braided Ledge
A fun ponytail style to try!

Our hairstyle video today is a combination style, utilizing a 4 strand braid, a simple twist braid, and a ponytail. This is a wonderful hairstyle for school, sports, and other casual occasions. Sometimes we want more than just a standard ponytail and this is a great way to wear your hair up and out of your face (while still looking super cute.) We named this ponytail the "braided ledge" because of the way the braids are sort of sitting on a ledge of hair along both sides of the head. ;)
We have actually had this hairstyle on our "tutorial to-do-list" for over a year now, but just haven't gotten around to creating a video until today. The Princess wears variations of this hairstyle often to school since it is so quick, and cute!
Our tutorial below shows how to create this style using a 4-strand braid, but you can really do this with any type of braid you want. We have tried a regular 3 strand braid, a fishtail braid, a rope braid, and even a chain. Each braiding technique gives this style a completely different look. This is a fun one to experiment with!

- 1 small elastic
- 1 medium elastic
- Bobby pins (if you need the style to be very secure.)
The Braided Ledge Video Tutorial: (Click here to watch the video directly on YouTube.)
Layered Woven Braid Tutorial & Updo Hairstyle
A unique woven braid!


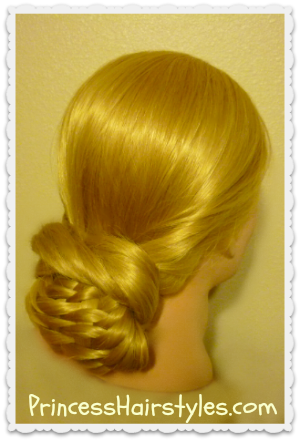
As shown in our video below, this braid is sort of a combination of a 4 strand braid, a waterfall braid, a fishtail braid, and a woven braid!
This braid can be worn as a half up hairstyle (as shown in the photos above) or braided into a full ponytail. When all of the hair is incorporated into the braid (in a full ponytail style) you will see more of a "layered look" similar to a "box braid" being formed. The pictures below are examples this. (credit: hairbyrotem.)


We also wanted to add our own creative spin using this woven braid, turning it into the base of an elegant updo (shown at the end of our video and in the photos below.)

Supplies Needed:
- One elastic or hair tie
- Gel, pomade, or damp hair to prevent flyaways
- 2 elastics and bobby pins (if you are creating the updo.)
Easter Hairstyles - Diagonal Stacked Ribbon Braid Updo
A glamorous braided updo with accent ribbon

If you follow us on Instagram, this updo may look slightly familiar. We shared this hairstyle on our account back in December as "The Princess" wore this hairstyle on Christmas Eve last year. Since that time, we have received many requests for a tutorial.

As you can see in the photo above (from December) the style looks a little bit different (with 3 layers of braiding versus 2 layers in our tutorial today.) The finished design you end up with will depend on the length of hair you are working with. If your hair is shorter than the princess's, you could actually complete this style with just one diagonal braid by tucking the ends in at the bottom, or ending with a small bun. If your hair is longer, you may end up with more layers of braiding as you stack and wrap the hair around itself!

This formal hairstyle would be great for many special occasions such as: Easter Sunday, Prom, Homecoming, recitals, communions, baptisms, holidays, weddings, etc. Depending on the occasion, you could change out the color of the ribbon to match the look you are going for. Or, if you are looking for something more subtle, you could actually just use another strand of hair (or braid) in place of the ribbon entirely.

Although this style looks pretty "fancy schmancy" it is actually not very time consuming. As long as you can figure out how to 4-strand braid.... you will be good to go in less than 10 minutes most likely.

Supplies Needed:
- Ribbon. We used a piece that was almost 7 feet long and folded it in half. The length is going to depend on the length of hair you are working with. I would suggest starting with a longer strand than you think you will need, as you can always trim it at the end.
- 2 small hair elastics
- Several bobby pins
Subscribe to:
Posts (Atom)


