
Zig Zag Parts
Showing posts with label Zig Zag Parts. Show all posts
Showing posts with label Zig Zag Parts. Show all posts
Spiral Braid Ponytail, Twist Hairstyles
An Easy, Quick, and Cute Hairstyle

I decided the video needed to be redone because our prior tutorial only shows one step in the style and it doesn't make sense if you are watching directly on Youtube. I didn't realize back then that some of you watch our videos on Youtube itself, rather than from our website (which shows the rest of the instructions in picture form) until we started getting comments on Youtube asking us how to finish the style lol. Duh!
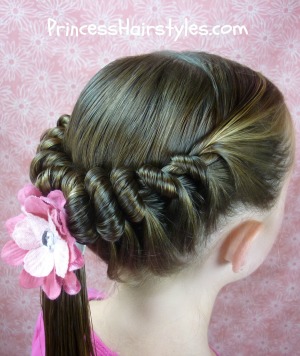


This hairstyle is versatile and can be made with wet or dry hair, curly or straight. In our video, the Princess's hair is damp. But, in the picture below, we styled her hair dry. It turns out great either way.
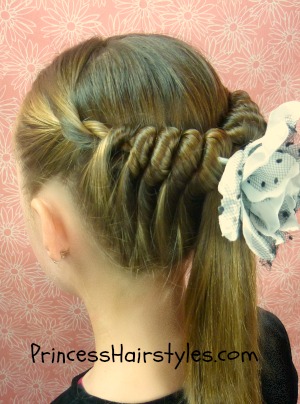
Spiral Braid Ponytail Video: Click here to watch the tutorial directly on YouTube.
4th of July Glowing Hairdo!
This hairdo is a "Princess Original!" She came up with this fun fourth of July hairstyle idea all on her own. :)
You may remember the collection of hairstyles for the 4th of July that we posted last year. You can browse through those if you're in the mood, and here's another crazy one to throw in the mix!
Of course this isn't the only hairstyle you could make "glow." After the Princess decided she wants glow sticks in her hair while she watches the fireworks on Independence Day, we had to come up with several more fun hairdo options using them! I'll post a few more if I get time before the 4th.
This one was fairly quick and easy. I made 3 cornrows with a zig zag part.....
 Then added the glow sticks! My advice would be to put them in right before you head out at night. The glowsticks we got lasted about 8 hours. They will probably burn out before you want them to if you add them too soon.
 This hairstyle would not only be fun for the 4th of July, but maybe even crazy hair day at school or at a night time party or sleep over!
The Princess was pretty excited about this one as you can tell in this video showing how to add the glow sticks......
Oh and the best part? She had darling curls after we took out the french braids for church the next day. 2 for 1!
You may remember the collection of hairstyles for the 4th of July that we posted last year. You can browse through those if you're in the mood, and here's another crazy one to throw in the mix!
Of course this isn't the only hairstyle you could make "glow." After the Princess decided she wants glow sticks in her hair while she watches the fireworks on Independence Day, we had to come up with several more fun hairdo options using them! I'll post a few more if I get time before the 4th.
This one was fairly quick and easy. I made 3 cornrows with a zig zag part.....
 Then added the glow sticks! My advice would be to put them in right before you head out at night. The glowsticks we got lasted about 8 hours. They will probably burn out before you want them to if you add them too soon.
 This hairstyle would not only be fun for the 4th of July, but maybe even crazy hair day at school or at a night time party or sleep over!
The Princess was pretty excited about this one as you can tell in this video showing how to add the glow sticks......
Knotty, Knotty - A Cute Messy Do!
Oh goodness. I just found this one in my drafts dated back in July of 08! For some reason I didn't include any step by step pics. Oh well, it's pretty self explanatory. Enjoy!
Make your zig zag part first. Then add the knots one side at a time. Add the ends from the previous section to the next knot all the way down. Pull everything together at the bottom and make some kind of a messy bun. (Just make sure to add an elastic at the bottom of each knot. Otherwise they will come undone.)
 I remember this picture, lol. She was trying to blow a bubble! :)
 Try not to make everything too perfect. Part of the charm of this style is the messiness!


 I also found this extremely old video showing how to do a knot. The sound stinks and it's not the greatest. It was actually taken for a different style that I lost the pictures for (yes I'm really organized) but the concept is the same. You get the idea, right?
Video Tutorial - Modified Twisty Hairstyle
 Start with some kind of a center part (we did a zig zag) and another part from ear to ear.
 Braid the 2 sections and tie them together with an elastic at the back.
 The next steps are easier to explain by showing........
Keep going until you get to the middle and tie it off with an elastic

Repeat on the other side and add a cute bow. We got this adorable, sparkly Tulle Flower Clip from Shimmy Shimmy Bowtique!
 If you wanted to wrap one braid all the way around her head and end in a side pony, you could do that as well.
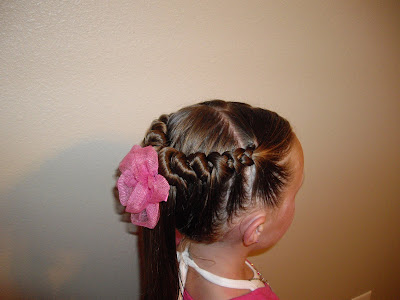
 From start to finish, this took 6 minutes. Another good one for school!
Quick and Easy Braided Pretzel
I haven't posted anything quick for awhile, and I know sometimes you just need something quick. So, I dug through my hair folder to see what I could find and came across this one: A 5-10 minute cute do!
 Start with a regular old set of braided pigtails. We did a zig zag part on top which isn't necessary, but I like it this way.
 Take one of the braids, fold it in half and put the end back through the elastic at the top of the braid.
 Now take the other braid and bring it through the loop you just made with the first braid. The same way you did the first one, put the end of the braid back through the elastic at the top of the braid.
 It should look something like this. (If your daughter's hair is a little shorter, try making the braids closer together to give you a few more inches to work with.)
 To keep it from drooping, place the braids where you want them and pin with a couple of crossing bobby pins. (I only used 2 bobby pins and it held all day long.) If you look closely you can see where I pinned it, at the top, to the left of the part.
 Add some cute clips or bows. We got these "ribbon flowers" from "Kaytebug Boutique."


 I didn't even curl the ends. Just added a little hairspray, fluffed them a little and let them sprout out freely! I wanted it kind of funky and messy looking. If the ends bug you, you could hide them or curl them. Just do whatever you like. This would also be cute made with twist braids. Or for a different look, up a little higher on her head.
 Start with a regular old set of braided pigtails. We did a zig zag part on top which isn't necessary, but I like it this way.Take one of the braids, fold it in half and put the end back through the elastic at the top of the braid.Now take the other braid and bring it through the loop you just made with the first braid. The same way you did the first one, put the end of the braid back through the elastic at the top of the braid.It should look something like this. (If your daughter's hair is a little shorter, try making the braids closer together to give you a few more inches to work with.)To keep it from drooping, place the braids where you want them and pin with a couple of crossing bobby pins. (I only used 2 bobby pins and it held all day long.) If you look closely you can see where I pinned it, at the top, to the left of the part.Add some cute clips or bows. We got these "ribbon flowers" from "Kaytebug Boutique."

 I didn't even curl the ends. Just added a little hairspray, fluffed them a little and let them sprout out freely! I wanted it kind of funky and messy looking. If the ends bug you, you could hide them or curl them. Just do whatever you like. This would also be cute made with twist braids. Or for a different look, up a little higher on her head.
Another Heart Hairdo..... Sort Of
This didn't quite turn out how I thought it would. Instead of a heart, it looks more like an oval. Oh well, it's still cute, and you can learn from my mistake and make it more heart shaped if you want to try it. This is how you start. And this is where I made the mistake. Make the straight part in the middle a little longer than I have it here and start your first ponytail closer to the middle of her head (towards the back of the part.) I think that would fix the problem.
 Keep going. After you make the straight part on top, make a zig zag part down to the bottom. The idea is that it's supposed to look like a broken heart. At least that was the idea....
 See..... oval, not heart shaped. I really should have put one more set of elastics right there in the middle above the zig zag.


Whatever, it was a good try..... Right???
K- I just did some browsing and another hair blog She Does Hair has almost this exact same style posted! We must be on the same wave length. What's even funnier? She made the same mistake I did with the shape. hehe If you want another take on it, go check hers out too!!
 This is how you start. And this is where I made the mistake. Make the straight part in the middle a little longer than I have it here and start your first ponytail closer to the middle of her head (towards the back of the part.) I think that would fix the problem.Keep going. After you make the straight part on top, make a zig zag part down to the bottom. The idea is that it's supposed to look like a broken heart. At least that was the idea....See..... oval, not heart shaped. I really should have put one more set of elastics right there in the middle above the zig zag.


Whatever, it was a good try..... Right???
K- I just did some browsing and another hair blog She Does Hair has almost this exact same style posted! We must be on the same wave length. What's even funnier? She made the same mistake I did with the shape. hehe If you want another take on it, go check hers out too!!
French Braid Broken Heart Hairstyle For Girls
K- I don't have a name for this one. I'm drawing a blank, it's just been one of those blah days. If you think of something-leave me a comment, I'll re-name it.
Thanks to a reader, this has now been named "The Broken Heart!" Make a part from ear to ear, then a zig zag part down the center. French braid each side, continuing with the braids down a ways. Temporarily secure both braids and make a pony with the bottom section of hair. Add the braids in with the pony and braid the pony itself. (Leaving some ends out on the bottom.)
 Flip the ends back up to the top of the pony and secure with an elastic. We added a scrunchy, you can if you want, but it's up to you. Spike, curl, or just let the ends lay like we did. (It's still wet here, it'll look better later-after it has had time to dry.)


Thanks to a reader, this has now been named "The Broken Heart!"
 Make a part from ear to ear, then a zig zag part down the center. French braid each side, continuing with the braids down a ways. Temporarily secure both braids and make a pony with the bottom section of hair. Add the braids in with the pony and braid the pony itself. (Leaving some ends out on the bottom.)Flip the ends back up to the top of the pony and secure with an elastic. We added a scrunchy, you can if you want, but it's up to you. Spike, curl, or just let the ends lay like we did. (It's still wet here, it'll look better later-after it has had time to dry.)


Tuck and Flip Braid Piggies
I love these tuck and flip braids because there are no elastics showing. The pigtails just spout right out of the braid! For instructions on how to do them, go here.


3 Zig Zagged Knots
Make your parts first, putting each section in temporary elastics. When you're ready for the knots, take the elastics out and tie the knot by wrapping the hair around your fingers and pulling the hair through the loop. (Add an elastic to the end of the knot, otherwise it WILL come undone. Put the elastic as close to the knot as you can and surround it with hair to hide it.)

 You can stop here if you want.
 Or, add a few curls, why the heck "knot?" Yes, I'm a nerd, people!


 You can stop here if you want.
 Or, add a few curls, why the heck "knot?" Yes, I'm a nerd, people!


Subscribe to:
Posts (Atom)


