
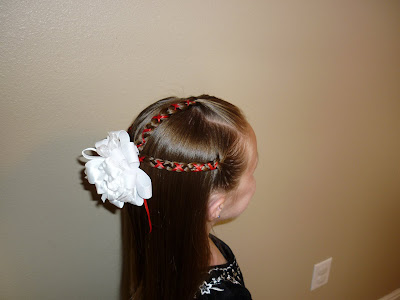
New Years Eve Updo
This New Years Eve hairstyle is actually from last year. I love it so much that I had to post it again!
A fancy schmancy updo for a special occasion. Maybe a New Years party, or even a flower girl hairstyle! She actually wanted a princessy type hairdo to go with her cute new Christmas dress.
 Make the parts first. We did one section in the front for her "bangs." One across the back going from ear to ear. And four diagonal sections going from the front to the back part. Put each section in a temporary ponytail to keep everything separated.
 Slick down the bangs and secure them above her ear with a clear elastic. Then, do some kind of a french braid in each of the four diagonal sections. We did french twist braids. If you don't know how to do that, we have a video tutorial at the bottom of this post.
 Place the finished braids up out of the way and pull the remaining hair into a ponytail. I did an upside down pull through in the ponytail to add a little volume.
 Next, gather all the braids directly underneath the ponytail and secure with an elastic. (You should now have 2 ponytails on top of each other.)
 Curl all the hair in the 2 ponytails.
 Now, to make the ponytail a little fancier: There is no exactness to this part. Just grab little sections of hair and sort of loop them around and secure them to her head with either bobby pins or little claw clips like this......
 Do as many sections as you want to. I think we ended up using five clips total.
 All done!


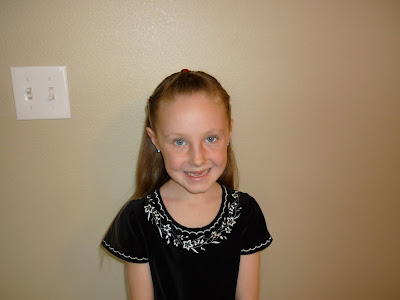
 This sweet little dress came from "Madison Browne" via a blog contest on This Mom Can Shop. It was one of her favorite Christmas presents this year! She looked just like a little princess with her fancy hairstyle and dress.

Here is a tutorial showing how to make the french twist braid cornrows:
I hope everyone had a Merry Christmas!! Ours was great. We'll see you all next year. :)
A fancy schmancy updo for a special occasion. Maybe a New Years party, or even a flower girl hairstyle! She actually wanted a princessy type hairdo to go with her cute new Christmas dress.
 Make the parts first. We did one section in the front for her "bangs." One across the back going from ear to ear. And four diagonal sections going from the front to the back part. Put each section in a temporary ponytail to keep everything separated.
 Slick down the bangs and secure them above her ear with a clear elastic. Then, do some kind of a french braid in each of the four diagonal sections. We did french twist braids. If you don't know how to do that, we have a video tutorial at the bottom of this post.Place the finished braids up out of the way and pull the remaining hair into a ponytail. I did an upside down pull through in the ponytail to add a little volume.Next, gather all the braids directly underneath the ponytail and secure with an elastic. (You should now have 2 ponytails on top of each other.)Curl all the hair in the 2 ponytails.Now, to make the ponytail a little fancier: There is no exactness to this part. Just grab little sections of hair and sort of loop them around and secure them to her head with either bobby pins or little claw clips like this......Do as many sections as you want to. I think we ended up using five clips total. All done! This sweet little dress came from "Madison Browne" via a blog contest on This Mom Can Shop. It was one of her favorite Christmas presents this year! She looked just like a little princess with her fancy hairstyle and dress.
Here is a tutorial showing how to make the french twist braid cornrows:
Heidi Hairdo - Christmas Style
I thought we were done posting until after Christmas. But, we did this hairstyle today and it turned out so cute. So, how could I not post it? :)


 K, I posted this quick....... in record time! Hope it makes sense, lol. And now I'm REALLY done. I haven't even started wrapping (or cooking, or cleaning.) aaack
I only have one picture of the steps (sorry.) I wasn't planning on posting this at the time I was doing it! It's actually very easy though. Just make some pigtails and braid in a ribbon or scarf on each side. (I didn't have two scarfs available, so I added one to only one of the braids. Whatever works for you!) Leave out some of the scarf hanging on both the top and bottom of the braid to make bows later.
Next, position the braids over the top of her head and sew them into place with a plastic needle and ribbon. Tuck the ends of the braids in with bobby pins of you need to. Then, make some bows on each side with the leftover ribbon or scarf.
This took less than 10 minutes!


 K, I posted this quick....... in record time! Hope it makes sense, lol. And now I'm REALLY done. I haven't even started wrapping (or cooking, or cleaning.) aaack
Holiday Bun
 It looks like this will be the last Christmas hairstyle I will have time to post. We actually just got back from Disneyland! And now we have all the Christmas stuff to do. So, I'll be taking a Christmas break from blogging.
Just for fun, here's a little glimpse into our trip....... The Princess meeting another Princess!
 And now back to the hairstyle....
Make a ponytail (We did ours on the side. The middle would work too if you prefer.) Split the ponytail in half and run 2 ribbons through the elastic at the top. (You can see the red ribbon here. We added white as our second ribbon.) Braid both sides of the ponytail and secure with clear elastics at the ends.
 Form one of the braids into a circular shape and using a plastic needle, sew the ribbon around the braid. Don't worry too much about the end of the braid at this point. You can tuck it in later.
 Starting on the other side, sew the remaining braid around the first one with the other ribbon.
 Tuck the ends in with a few bobby pins. Then, tie the ends of the ribbons into bows so that they don't come undone and finish it off with a cute Christmas bow.
 I put some french braids in front before we started the bun just for fun this time.
 Another day we did this bun without the french braids and added some elastic braids instead.
 I hope everyone has a Merry Christmas and we'll see you after the holiday!
 Christmas Hairstyle - Holly Berries
Another fun holiday hairstyle....
 This one is very simple. Just some barbie bangs and 3 knots to form the "berries." (Make sure to add an elastic to the bottom of the knots to keep them tight.)
 We stole some "accessories" off an ornament on our Christmas tree!
 Sorry about the dark picture. Don't know what's up with that?


 This one is very simple. Just some barbie bangs and 3 knots to form the "berries." (Make sure to add an elastic to the bottom of the knots to keep them tight.)We stole some "accessories" off an ornament on our Christmas tree!Sorry about the dark picture. Don't know what's up with that?
She had some braids in the day before which made some cute waves. We finished off the look by curling in some ringlets with our curling iron.
A Prayer For A Friend.....
 I realize this is a hair blog. But sometimes there are more important things in life than hair, ya know? Late Monday afternoon my dear blogging friend (Shellie) lost her 2 year old son in a drowning accident. I have a 3 year old son, so it really hits home how devastating something like that would be. I can't imagine what she's going through right now. I'm joining the blogosphere in a special "Wordless Wednesday" dedicated to Shellie. If you want to join in, take a picture of a candle lit in honor of Shellie's sweet angel (Bryson Ross) and post it on your blog. (I ended up having to take the links off because it was messing up our page.) If you did a special candle post and want to add your link, please leave it in the comments. Thanks!
The Winner! (And Other Stuff)
Our winner of The Crafty Moms gift certificate has been announced! Go here to see who it is.
In other business: If you are wanting to purchase a hairstyle book as a Christmas present; today is the last day to order that it will for sure get there on time. We are leaving town tomorrow for a few days and won't be shipping out books during that time. If you order one while I'm gone, I will ship it out as soon as I return. It may make it before Christmas, but there are no guarantees. So, order today if you can!!! Thanks!
In other business: If you are wanting to purchase a hairstyle book as a Christmas present; today is the last day to order that it will for sure get there on time. We are leaving town tomorrow for a few days and won't be shipping out books during that time. If you order one while I'm gone, I will ship it out as soon as I return. It may make it before Christmas, but there are no guarantees. So, order today if you can!!! Thanks!
Christmas Hairdo - The Christmas Tree
K, we have quite a few Christmas hairstyles ready to go. The Princess has been wanting "Christmas hair" ever since we put our tree up after Thanksgiving! Hopefully I'll have time to post them all. It's been busy around here (as I'm sure it has been for everyone.)
I didn't do step by step pictures for this style. I decided it would take too long and I'm guessing everyone knows how to do these connectors anyway. Make them in the shape of a tree by starting with one at the top and adding one more to each row all the way down. As you can see...the sides are connected, but the ones in the middle are just sitting on top.


 Before she went to bed we added some braids so that she would have waves in the morning.
  Although this one took awhile (almost 20 minutes) she actually ended up wearing it for 3 days! It was worth the extra time.
I didn't do step by step pictures for this style. I decided it would take too long and I'm guessing everyone knows how to do these connectors anyway. Make them in the shape of a tree by starting with one at the top and adding one more to each row all the way down. As you can see...the sides are connected, but the ones in the middle are just sitting on top.

 Before she went to bed we added some braids so that she would have waves in the morning.
 Giveaway!! The Crafty Moms - Gift Certificate
Just in time for Christmas! Head over to our giveaway blog for a chance to win a $20 gift certificate from The Crafty Moms!! (Adorable stuff, you don't want to miss this one.)
P.S. Please do not enter on THIS post. Go here to put your entries in: http://hairandshare.blogspot.com
P.S. Please do not enter on THIS post. Go here to put your entries in: http://hairandshare.blogspot.com
Christmas Hairstyle - The Present
Here's the look we're going for ....... :)

A cute and easy holiday hairstyle!
To begin, make 3 regular braids, nothing fancy.

Side view.....
Tie all the braids together in the back with an elastic. Then, thread a ribbon onto a plastic needle and bring it up through the elastic to begin sewing. Sew the ribbon across the braid on the left, stopping at the top of the braid......
 Now heading back in the opposite direction, sew across the braid again, back to the elastic.
 Sew up and down the braid in the middle and the braid on the right. The end of the ribbon should now be back to the elastic again.
 Tie the ends of the ribbon into a knot (so that it won't come undone) and add a cute bow to finish off the "package."
  Of course if you wanted to, you could just braid the ribbon right into the braids instead of sewing the ribbon on. That might be quicker. Whatever you prefer!
 She makes such a cute present!
A cute and easy holiday hairstyle!
To begin, make 3 regular braids, nothing fancy.
Side view.....
Tie all the braids together in the back with an elastic. Then, thread a ribbon onto a plastic needle and bring it up through the elastic to begin sewing.
Sew the ribbon across the braid on the left, stopping at the top of the braid......Now heading back in the opposite direction, sew across the braid again, back to the elastic.Sew up and down the braid in the middle and the braid on the right. The end of the ribbon should now be back to the elastic again.Tie the ends of the ribbon into a knot (so that it won't come undone) and add a cute bow to finish off the "package."  Of course if you wanted to, you could just braid the ribbon right into the braids instead of sewing the ribbon on. That might be quicker. Whatever you prefer!
 She makes such a cute present!
Oh and by the way.... My blogging friend (Trisha) over at momdot.com purchased our new hairstyling book last week and wrote up a fun post about it. She even modified one of our hairstyles from the book to try out on her cute daughter and did a great job! I love getting feedback and it's fun to see our little book highlighted on her amazing blog for mommy bloggers! To see what she has to say, and her cute version of one of our hairstyles, go here: http://www.momdot.com/howtohairstyles
Subscribe to:
Posts (Atom)


