13 Halloween Hairstyles
Have you decided on a Halloween costume this year? We wanted to share a few of our favorite Halloween Hairstyles with you today (just in case you are looking for some last minute ideas.) We had a great time going through our archives to find these 13 styles. I'm guessing (unless you've been following our blog since the beginning of time) some of these hair styles will be "new" to you.
Please enjoy our quick Halloween Hairstyles collection video below. The links for all of the tutorials can be found inside the video itself, or right here underneath the video.
Click the following links to go directly to the tutorials:
Princess Crown Made From Hair
Disney Princess Jasmine Hairstyle
Fancy Princess Updo
Princess Bun With Beads
Inspired By Rapunzel Hairstyle (Ribbon Braid)
Disney Princess Belle Hairstyle
Spider Hairstyle
Spider Web Hairstyle
Princess Headband With Jewels
Candy Corn Hairstyle
Cupcake Pigtails
Taylor Swift Hairstyle
Cinderella Hairstyle (would also work for Tinkerbell)
Happy Halloween!!
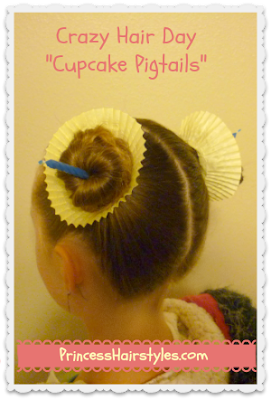
Crazy Hair Day Hairstyle!
"Cupcake Pigtails"
We weren't planning on making a tutorial today. But this hairstyle turned out pretty cute, so I decided to share this quick "crazy hair" idea with you.
This was one of those last minute things. You know when your child tells you it's crazy hair day (the morning of) and you get to whip something up in 5 minutes? Yeah, that's one of the fun things about being a mom! This hairstyle should work great for a time like that..... as we tested it for you this morning. :)
Step by step instructions:
1. Make a set of pigtails.
2. Take 2 cupcake liners and cut a hole in the bottom of each one with a pair of scissors.
3. Twist up the hair in the pigtails (to hold the hair together) and thread the ends through the holes in the cupcake liners (one at a time.)
4. Push the liners up to the top of the pigtails on each side.
5. Wrap the hair up into buns inside the liners, and secure with clear elastics. You can make any type of bun you want. She wanted this to look like "swirled frosting" so I took the hair, twisted it, and wrapped it around itself.
6. (Optional) Decorate your "cupcakes." We stuck a candle through the center of each of the buns for a birthday cupcake look. You could also add glitter, "colored frosting" (hair chalk or spray,) a cherry... whatever you want!
We would love to hear your crazy hair ideas in the comments. Or, if you have pictures of styles you have done in the past, please feel free to share them on our facebook page! It is always fun to see what you guys come up with.
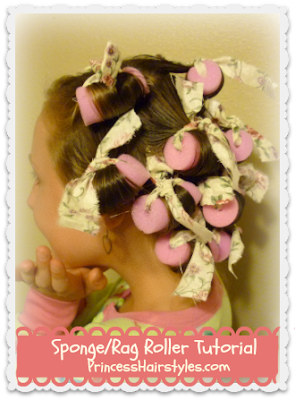
No Heat Curls Tutorial, DIY Sponge Rag Rollers
Heatless Curls, Overnight.
So Comfortable To Sleep In!
Although I would love to take credit for this amazing idea.... I am not the creative genius behind these sponge rag rollers. This is a (gasp) copied design! I first saw this idea on Pinterest (where else?) which led me to a very fun blog called The Mother Huddle, which you should definitely check out! So Comfortable To Sleep In!
I'm typically not really much of a crafter, but this is one of those projects that I could not pass up. No sewing or gluing involved, very quick and easy, fairly inexpensive, and a great end result. These heatless curlers needed to happen, and needed to be shared!
We have always loved the overnight curls created by using standard sponge (or foam) rollers. I remember wearing these when I was a little girl, so they have been around for a long time! But "The Princess" doesn't particularly enjoy sleeping in them because the plastic clamps (which hold the curler to your head) typically end up poking her during the night. We have also had problems with her long hair getting snagged and tangled around the edges and hinges of these rollers, which can turn into a nightmare when it is time to take them out. And, as much as I love classic "rag curls" (as they are comfortable to sleep in) rag curls are not my favorite curling method because sometimes the curls can end up being very tight and frizzy looking.
These sponge rag rollers really do make awesome, smooth, uniform curls (as shown below) with no discomfort while you are sleeping, or snags while taking them out!
Supplies Needed:
* Foam/sponge rollers. We opted for the largest size of sponge rollers we could find, as we wanted soft, loose, and bouncy curls this time. You can definitely purchase smaller rollers if you prefer tighter curls. The ones we ended up buying are made by "Conair" and I noticed at least 3 different sizes available and several other brands while we were looking. Of course it will depend on your hair texture and length, but we used 15 rollers total.
*Scissors
*Scrap fabric. If you have an old pillowcase, that will work great!
*Something to push the fabric through the rollers. We used a plastic craft needle (which can be found in most craft stores.)
Enjoy our video tutorial below, as the princess herself teaches how to make these rollers!
These curls are going to come out a little bit different depending on how you wrap them up. We chose to wrap them horizontally this time, which creates more of a tousled, natural looking curl. You could wrap them vertically instead for more of a spiral look.
A fun little side note: I asked the princess how these were to sleep in and she told me it felt like she was wearing soft little pillows all over her head, which cradled her to sleep. ;)
Candy Corn Hairstyle For Fall
An "Elastic Web" Hairstyle Inspired By Candy Corn! Cute Hair Style For Halloween, Thanksgiving, & Fall In General.
Some of you may remember the "candy corn style" we posted several years ago on our Princess? This has been one of our all time favorite hairstyles for Fall and I feel bad that we never made a video tutorial. So, this is a remake for all of our YouTubers. This hairstyle is great because it works with short hair, thin hair, thick hair, medium hair, and of course, long hair. Pretty much any hair texture or length (and as you can see, even toddler hair.) This is also a very easy hairstyle to complete with no braiding skills required!
When we first did this style on the princess, we left her hair down and added some curls. This time (on the pea) we chose to pull the rest of her hair into a side ponytail with a messy bun. I love the look of the "candy corn" laying on the side of her head, but if you prefer, you could definitely start the first row along the front (bringing the design straight back to the middle of her head.)
Supplies Needed:
Quite a few miniature, mulit-colored rubber bands (the amount will depend on how many rows of elastics you choose to make.) We purchased ours at Walmart and the brand we prefer is "Goody Ouchless." We used orange and yellow bands this time. Of course, you could add in white or brown as well if you want, as candy corns come in several different varieties. ;)
Candy Corn Hairstyle Video Tutorial:
(Be sure to watch the end of this video for a fun clip of "The Pea!"
I realize that many of our Halloween hair ideas are fun, but might be considered rather obnoxious for certain occasions (for example the spider bun!) But, I think this candy corn style is subtle enough that it could look nice even for church or school. Most people would probably not even realize it is supposed to be a candy corn and just think it is a cute hairstyle!
Halloween Hairstyles
Princess Crown Hairstyle
Today's tutorial is literally a hairstyle for a princess. A crown (or tiara) made from hair!
We've been so excited for Fall to come around again. At our house, this means Halloween decorations, treats, pumpkins, fall leaves, cooler weather, costumes, and of course... Halloween hair!We're guessing that some of you may be planning to dress up as some type of princess for Halloween this year? Instead of buying a crown to go with your costume, what about making one out of your own hair? The best part, this crown won't get lost or broken, it won't get tangled up in your hair, and your head won't be poked with those awful plastic prongs all night long while trick or treating. ;)
We thought about (and tried) several different methods for creating a crown of hair and finally settled on this one. Some of the ideas we came up with involved french braiding, and others would require wire or pipe cleaners to help the hair hold its shape. We really love this simple crown because you don't need to know how to french braid to make it, it is quite easy, and the only supplies you will need are a couple of bobby pins and one elastic. Of course if you want to, you could add some glitter to your hair to make the crown sparkle!
As you may have noticed, my daughter has quite long hair. If your hair is on the shorter side, you could still use this basic idea but you may need to modify it a bit. You could also turn this into an updo or add some curls (depending on the look you are going for.)
Princess Crown Hairstyle Tutorial:
This Halloween Hairstyle would work with many costumes beyond the "classic princess hairstyle." For example: A Fairy, any of the Disney Princess's (Belle, Sleeping Beauty, Cinderella, Merida, Snow White, Ariel, Sofia, etc.) A Bride, Queen, Witch, Beauty Queen, Miss America, Prom/Homecoming Queen.... the list could go on and on!
We do have a few more Halloween Hairstyles ideas (click the link) if you are still looking for the perfect hairdo.
Lace Braid Rose Hairstyle For Long Hair
An Elegant Braided Updo Featuring Braided Roses
If you follow us on Facebook you may have seen a photo of this hairstyle (which was actually done on a mannequin head) posted last week. We have noticed this beautiful hairstyle floating around on Pinterest, and Instagram quite a bit lately. We have also received several requests, so I thought we would give it a try!
This hairstyle is really not that complicated as long as you know how to lace braid, although it is a little more time consuming than some of the styles we have done. You will probably need to give yourself 15-20 minutes to complete all of the braiding and pinning. Since this hair style is so lovely, romantic, beautiful, and feminine, I would say the extra time is definitely worth it! Anytime I see braided flowers (or roses/rosettes) in someone's hair, it always looks so pretty. You really can't go wrong with braided roses!
I'm thinking this style would be great for many special occasions such as: a wedding, flower girl, prom, homecoming, church, recital, communion.... you get the idea!
Supplies Needed:
- 2 small clear elastics
- 1 medium sized clear elastic
- 2 clips or cloth covered elastics to temporarily hold the ends of the braids
- Several bobby pins (we used miniature bobby pins from Sally Beauty Supply.)
- Comb or brush
- Hair spray (optional)
- Fairly long hair
Please feel free to share this style using the buttons below if you loved it. ;)
Subscribe to:
Posts (Atom)


