Top Hairstyles of 2014
It has become a yearly tradition for us to go through our tutorials from the past year (52 total!) and choose our favorites for our annual top hairstyles countdown video!
Hope you enjoy our 14 favorite hairstyles, braids, and tutorials from 2014. We hope to see you all in 2015! (Click here to watch the video directly on YouTube.)
Which was your favorite hairstyle?
Listed below are the 14 hairstyles we chose this year, with links to each tutorial on YouTube:
#14 Ribbon Rainbow Ponytail
#13 Star Flower Bun
#12 Shooting Star Braid
#11 Reverse Pull Through Braid
#10 Fishtail Mermaid Braid
#9 Dutch Rose Braid
#8 Waffle Cone Braid
#7 3 Easy Ponytails
#6 Braided Bubble Bun
#5 3 Strand Fishtail Braid
#4 Arrowhead Braid
#3 Snowflake Hairstyle
#2 Window Braid
#1 Twisted Edge Fishtail Braid
Countdown videos from years past, if you're curios!
2013 favorite hairstyles:
2012 favorite hairstyles:
2011 favorite hairstyles:
Christmas Hairstyles
Have you chosen a hairstyle for Christmas (or Christmas Eve) this year? Below are a few "Christmas themed hairstyles" that we think would be cute this holiday season. Enjoy!
The Snowflake Hairstyle
Elastic Christmas Tree Hairstyle
Candy Cane Side Ponytail
Candy Cane Braid
We want to wish all of you a very Merry Christmas and a happy holiday season!
The Snowflake Hairstyle
Elastic Christmas Tree Hairstyle
Candy Cane Side Ponytail
Candy Cane Braid
We originally named this next one the "cookie cutter braid." But... we also think it looks a lot like a Christmas ornament hairstyle!
Maybe you are looking for more of an elegant hairstyle for Christmas? We love this Fishtail Bow Tie Braid with hair jewels:
Ribbon Christmas Tree Hairstyle
Snowflake Ponytail, Winter Hairstyles
A "Frozen Hairstyle"... literally!
We decided on a fun and festive snowflake hairstyle for our tutorial this week (since the holidays and the winter season are upon us!) This design is kind of a spinoff of one of our favorite updos that we posted on our site way back in 2009, the fancy Princess Bun. With a few slight changes and some added ribbon, this Princessy bun transforms into a lovely snowflake hairstyle!
This unique design would be a cute hairstyle for Christmas, New Years, holiday parties, winter weddings, sledding, skiing, and... all winter long. I could also picture this as a fun and different hairstyle to go with an Elsa or Anna (from Disney's Frozen) costume or dress!
If you are wanting to wear this hairstyle for dance, figure skating, gymnastics, etc... you could take the hair in the ponytail and create a sock bun (or any other type of bun) to keep it out of your way.
Also, for a more elegant look, you could curl the hair in the ponytail, or create a tousled updo with some curls in the center of the snowflake.
Supplies Needed:
- Several small, white elastics
(We used 10, but it is going to depend on how many ponytails you add to start with.) - 2 medium, white elastics.
- Claw clips, to keep things from unraveling while you work.
- White ribbon, cut into 2 - 2 1/2 ft lengths. (We used 5 pieces, but again, it is going to depend on how many ponytails you start out with.)
- Scissors, nail clippers, or a seam ripper to easily remove the elastics when you are done (optional.)
Just a heads up: Most of the styles we post on this blog are less time consuming than they look and rarely take over 10 minutes.... not the case with this one. ;) I would give yourself around 20-30 minutes to complete this style. Pull out a movie, snacks, game, or book... you are going to need it!
P.S. If you are looking for less of a winter look and more of a spring/summer hairstyle, this same technique could be used to make a beautiful hair flower! Just change the white ribbon and elastics out for pink, yellow, or purple. You will then create flower petals instead of ice crystals!
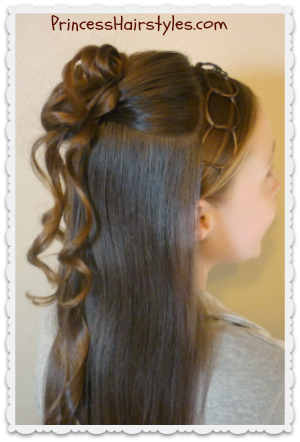
Formal Half Updo Hairstyle, Cascading Curls and Chains
We wanted to create a formal half up half down hairstyle for our tutorial this week. I'm sure many of you will be attending holiday parties, formal dances, recitals, concerts, church, winter weddings, Christmas celebrations, Hanukkah, New Years Eve (among other fancy schmancy events) this season. This fancy hairstyle would be perfect for many of these special occasions and is actually quite easy to recreate. Yay!
One of our all time favorite hairstyling techniques (and one of the very first posts we ever placed on this hair blog) is the "chain braid." It has been quite awhile since we have shown this technique in a hairstyle, so we wanted to add a chain to this elegant style today. The Princess always receives compliments when she is wearing chains (as they are quite unique looking.) I'm sure you will too!
As you can see, we placed a chain on just one side of this hairstyle and left the other side plain. If you prefer, you can add a chain to both sides.
Since the Princess doesn't have any bangs, we used the hair in the very front to create our headband made of hair.... which we refer to as "Barbie bangs." If your daughter has bangs (or fringe) cut, you can make the headband directly behind the bangs and it should work just fine.
And then of course, what would a half updo be without some cascading curls? We love the "princessy" look of this hairstyle and the glamorous volume created with these curls. Beyond the holidays, I could see this working for Prom, Homecoming, or maybe even a bride.
Supplies needed to recreate this style:
- 3 small elastics
- Several bobby pins
- Water, gel, or pomade to help control flyaways
- Curling iron or curling wand
I would plan on about 15 minutes to complete this pretty hairstyle (depending on how much of the hair you choose to curl.) As shown in our video below, we only curled the hair in the half ponytail, which did save some time.
Cascading Curls and Chains Half Up Hairstyle Video Tutorial: (Click here to watch the video directly on YouTube.)
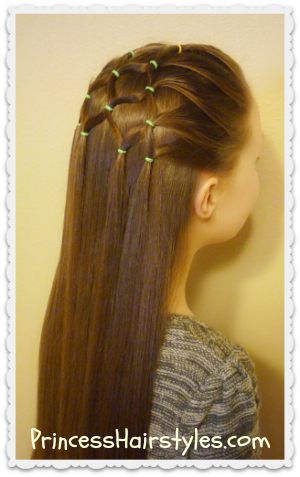
Elastic Christmas Tree Hairstyle
Hey guys! Our hair tutorial this week is a recreation of a Christmas hairstyle we posted on our blog way back in 2009 (before we did much on YouTube.) "The Princess" was only 6 years old in our original Christmas tree hairstyle post and is now 11! (How fun to look back at those old pics.)
We wanted to add a new Christmas tree hairstyle video tutorial this holiday season (for those of you who have requested it over the years.)
We wanted to add a new Christmas tree hairstyle video tutorial this holiday season (for those of you who have requested it over the years.)
As you may have noticed, this "tree hairstyle" design is quite subtle and not obviously a Christmas tree at first glance... which is what we wanted for today. The Princess was headed to an elegant Christmas dinner the day we filmed this style, and we didn't want an overly obnoxious Christmas tree in her hair for this particular occasion!
Of course, this half up-half down hairstyle could really be worn any time and not just for Christmas. The "elastic net" look always reminds me of a medieval princess for some reason! If you wanted to, you could place a small jewel (or hair jewelry) at each elastic for some added sparkle, which would be so pretty and glamorous.
If you are wanting more of a festive looking tree for a lively Christmas party.... or even a hairstyle to go with an "ugly sweater contest," ;) you could add some ornaments or lights to this style (which would make the Christmas tree really stand out!) Also, if you place the elastics closer together, you can form more of an obvious triangular tree shape (if that is the look you are going for.) We didn't have any ornaments or lights laying around when we filmed this style, so we photo-shopped some in for you as an example below!
You might notice the elastic at the top of our "tree" is yellow, while the rest of the elastics are green. The yellow elastic is supposed to be the star! You could also place a brown elastic, or braid the middle section at the bottom of your tree as a trunk if you want.
Supplies needed to create this hairstyle:
- Several small elastics. (We used 15 total.) The brand of elastics shown in our video are "Goody Ouchless." Of course, you can use any color or brand you want.
- Accessories such as ornaments or lights to decorate your tree (optional.)
- Water, gel, or pomade, to help control flyaways (optional.)
- Around 15-20 minutes.
Elastic Tree Hairstyle Video Tutorial: (Click here to watch the tutorial directly on YouTube.)
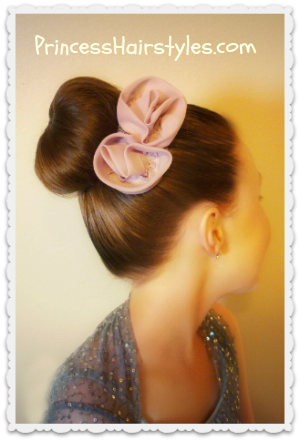
Dance Hairstyles, Donut Bun / Sock Bun 101
How to make a donut bun (or sock bun) with no leftover ends.
We are going back to basics with our tutorial today! "The Princess" had a dance recital recently, so we decided to "hit two birds with one stone" and film a tutorial of her dance hairstyle as she was getting ready for her performance. Her dance instructor prefers that everyone on the team has a similar hairstyle for their performances and has requested a simple sock bun for each dancer.
The technique we are showing in our video below is not a new method, but one that has been around for a very long time. Surprisingly we have not shown this particular bun on our hair blog up until now (even though the princess wears her hair like this often for dance recitals and competitions.) I'm sure many of you already know how to create this type of bun, but we are hoping the few tips and tricks we are sharing in our tutorial today might help someone. ;)
A few years back we showed a different method for making a donut bun, which in my opinion works better for shorter hair. So, if your hair is on the shorter side, I would recommend our older video. As "the princess's" hair has gotten longer, we prefer the method we are showing today..... since there are no extra "ends" to wrap around the bun or pin into the base to finish off the bun. Lately it seems her "leftover ends" can be thicker than the bun itself when we use the prior method!
Of course, this hairstyle doesn't have to be just for dancers and figure skaters. This style would work great as a sleek and sophisticated bun/updo for many other occasions as well. And as a bonus, it is super easy and quick (around 5 minutes!)
Supplies needed to create this look:
- A bun maker or hair donut
The hair donut we used in this video was actually purchased at the dollar store. These can also be found in most beauty supply stores and discount stores for just a few dollars. ;) Of course if you do not have a bun maker, you can used a rolled up sock with the toe cut out instead (which will work just as well.) - 1 elastic or hair tie for the top of the ponytail.
- Several bobby pins (optional.)
- Finishing hair spray (optional.)
Donut Bun / Sock Bun Video Tutorial: Click here to watch the tutorial directly on YouTube.
Are any of you in dance? If so, how do you usually wear your hair for performances?
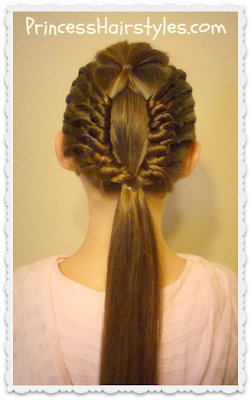
Twisted Edge Fishtail Braid Hair Tutorial
A fishtail braid... with a twist
Hey guys! Our video tutorial this week is on a fun variation of the ever popular and trendy fishtail braid, which we are calling the "twisted edge fishtail."
We love that this braid tends to hold up quite well and would be perfect for school, work, sports, and other occasions.
The basic idea and inspiration for this braid came from a combination of several techniques which we have shown in past videos: A "feather braid" a "scallop braid" and of course, a "fishtail braid." Unlike the scallop braid, we chose to remove just one strand at a time from the fishtail, while keeping these strands closer to the original braid as they are added back in. This is what creates the twisted pattern along both sides of the braid.
I'm loving the illusion of how thick this braid makes the Princess's slightly fine hair look. So pretty! Of course, if you wanted an even thicker looking braid, you could stretch the strands along both sides of the braid, which would give the braid even more dimension and "puffiness."
Like most fishtails, this braid is a little more time consuming than some braids, but really not too bad. I would plan on about 5-8 minutes to complete your braided ponytail (although this will depend largely upon the length of hair you are working with.)
If you so desire, this braid can also be wrapped up into a bun, forming a beautiful patterned updo.
Supplies needed to create this style:
- 2 hair ties/elastics (1 for the top of the braid, and 1 for the bottom.)
- Water, gel, hair wax, pomade (etc.) to help control flyaways.
Twisted Edge Fishtail Braid Video Tutorial: (Click here to watch the tutorial directly on YouTube.)
Window Braid Tutorial, Edgy Hairstyles
A cute and unique ponytail hairstyle to try.
Our hair tutorial this week features a fun hair design which our princess has named the "window braid." The twists wrapping around each side of the oval shaped center of the hairstyle remind us of curtains being pulled back around a window!
If you have been following us for awhile, the twisting technique utilized in this hairstyle may look familiar. We have shown a similar "twist braid" in past videos, including our spiral braid ponytail tutorial as well as our pinwheel bun.
We love the edgy "high fashion" look of this style with the sides slicked back into "cornrow twists" and a low ponytail. For a more dramatic effect, you could tease the "bangs" area to create a higher and more voluminous pompadour in the front if you choose. And, if you have extra time, you could braid in actual cornrows instead of the (much quicker) twists, if you so desire.
We wanted to include an outdoor shot of this hairstyle, as we filmed this one during the first snowfall of the season in our area. So beautiful... and so cold!
Supplies needed:
- 3-4 clear hair elastics (or similar to the color of hair you are working with.)
- Gel, pomade, wax, or water to help with flyaways.
- Rat tail comb (optional.)
- Approximately 10-15 minutes.
Window Braid Video Tutorial: (Click here to watch the tutorial directly on YouTube.)
Scissor Waterfall Braid & Fishtail Combo
A Cute Side Braid Hairstyle
Our tutorial today is showcasing another hairstyle idea featuring the "waterfall scissor braid."
If you did not see our video last week, we did a variation of this scissor braid (using rope braids) which ended up as a pretty "tie back waterfall hairstyle" linked here: Waterfall scissor twist braid.
As mentioned last week, we originally saw this new braid on the wonderful "Viriyuemoon's" Spanish YouTube channel and loved it so much, that we just had to sneak in one more style utilizing the braid this week!
There are so many different styles and variations that could be made using this braid, we had a hard time deciding what we wanted to do for this tutorial. We finally settled on a simple side fishtail with the scissor braid diagonally curving over the top.
I'm predicting the Princess will be wearing this hairstyle to school quite often (since this is fairly quick and stays in place quite nicely.) We noticed that having the hair run through the scissor braid before it is braided into the fishtail helped to hold any stray pieces from the side in place better than wearing a fishtail by itself. ;)
Depending on the look you are going for, of course you can make your fishtail braid more messy, full, and deconstructed looking... or leave it as is for more of a sleek looking plait.
Supplies needed:
- 1 hair elastic to tie off the end of the braid
- Pomade, wax, gel, or water to help prevent flyaways (optional)
Scissor Waterfall Braid and Fishtail Hairstyle Video Tutorial: Click here to watch the tutorial directly on YouTube.
Waterfall Braid, Scissor Twist Technique
A Waterfall Braid, With A Twist.... Or Two. ;)
This week, our hair tutorial (the "scissor twist waterfall braid") is a variation of a lovely braid we first saw on a Spanish YouTube channel ("ViriYueMoon") called the "waterfall scissor braid."
Our Princess has worn the original scissor braid several times and loves it! In the original version of this braid, regular strands of hair are used in the plaiting. We wondered what this unique braid would look like if we added some "twists" or rope braids in place of the regular strands, and we both ended up loving the outcome of this variation, so we wanted to share our results.
This tie back hairstyle has a similar look to a waterfall twist braid (or more accurately... a double waterfall twist braid with rope braided strands.) But as you can see in our video tutorial (below) this technique is quite different.
As shown towards the end of our video, you can choose to spread these twists apart to create a ladder braid type of effect (which is what we chose for our photographs here.). Or, keep the twists closer together for a completely different look. Also, we chose rope braids for our individual strands, but you can really use any type of braid you want.
We wanted to include a front view of this hairstyle. ;) The Princess doesn't have bangs, but we left some hair out of the braids around her face for a soft and feminine look. After the braiding was complete, we curled her hair using a curling wand.
Supplies Needed:
- Several "temporary" hair ties or clips to help hold the braids while you are working.
- 1 clear hair elastic (or an elastic which matches the color of hair you are working with.)
- Gel, pomade, finishing hairspray (optional.)
- Curling Iron, Wand, or similar (if you choose to add curls.)
Scissor Twist Waterfall Braid Video Tutorial (click here to watch the video directly on YouTube.)
In the picture below, we used the same technique shown in our video (above) but instead of using rope braids, we substituted regular 3 strand braids. Love how this turned out!
6 Disney Princess Hairstyles And Tutorials
We have gathered all of our Disney Hairstyles together in one place today for easy searching.
These Princess Hairstyles would be great for Halloween Hairstyles, or for visiting Disneyland/Disneyworld, Disney events, plays, movies, etc. Of course, maybe you just want to be a Princess for the day.... that's ok too! Enjoy!!
Elsa Hair Tutorial
Anna Hair Tutorial
Belle Hair Tutorial
Aurora Hair Tutorial
Cinderella Hair Tutorial
Jasmine Hair Tutorial
Cascading Bows Ponytail Hairstyle
A cute and girly hairstyle.
This tutorial features bows made from hair, cascading down a ponytail.
The basic idea for our video today is based off of some cute hair bows that we first saw on an Instagram account called "kares84." If you follow us on Facebook or Instagram, you may remember seeing the photo we are referring to (as we shared it a few weeks ago on our pages.) In the original hairstyle, the bows were utilized in a "French bubble braid." We decided to try them out cascading down a regular ponytail for our video today.
Of course, you can add as many bows as you want to your style (some of this will depend on the length of hair you are working with.) As shown in our tutorial below, you can stop at just one (which our princess has named the "eyeglasses ponytail") or you can add several bows down the length of your ponytail. Also, the strand of hair in the middle of the bow is optional and can be left out or added in, for two different looks.
As shown below... the "eyeglasses ponytail." ;) This is The Princess's favorite variation of this style!
.
I think incorporating these bows would make such a cute hairstyle for a flower girl or other special occasion. And really, they are not time consuming to create, so I could see this working as a hairstyle for school mornings... when you want something more than just a standard ponytail.
Supplies needed to create this look:
- 1 elastic for the top of the ponytail, as well as 1 small elastic for each bow. (Depending on how you finish each bow, you may need one more elastic to secure the end.)
- Gel, pomade, finishing hairspray (optional)
Cascading Bows Ponytail Video Tutorial: (Click here to watch the video directly on YouTube.)
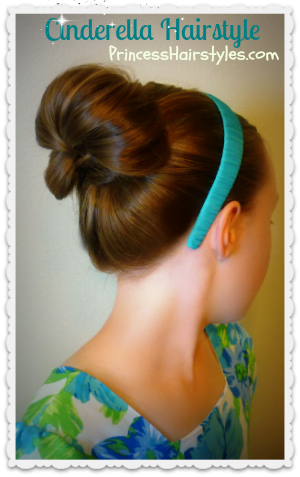
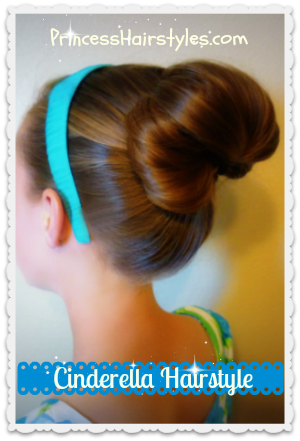
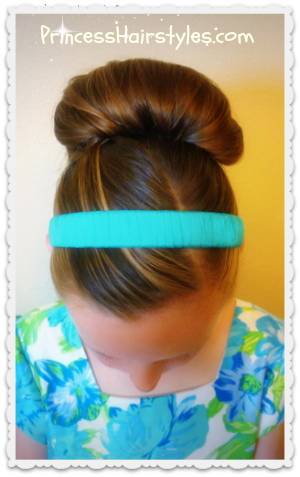
Cinderella Hairstyle, Princess Hairstyles
Hey guys! As part of our "Halloween hairstyles series" this month, we wanted to add another style to our Disney Princess Hairstyles collection. We decided on a beautiful Cinderella inspired updo. Anyone planning on dressing up as Cinderella for Halloween this year?
Also, this hairstyle doesn't have to be just for Halloween. I think this would make a lovely and elegant style for a flower girl, bride, Prom, Homecoming, church, etc.
I'm assuming pretty much everyone has watched Cinderella at some point, right? You might remember she was wearing a style similar to this at the ball (while wearing the gorgeous blue ball gown.) Of course, this is not an exact replica of Cinderella's hairstyle (as is the case with most cartoon inspired hair) but rather our interpretation of a Cinderella bun.
There are many different ways you could go about creating this style and we actually tried a few different techniques before we settled on this one. We mostly just wanted to keep this tutorial easy, simple, and quick for everyone. ;) The technique we used in our video tutorial below should work with long hair, medium hair, and maybe even hair on the shorter side. If you are working with extremely thick hair, you may want to split the ponytail up into a few different sections before you roll her hair up, instead of creating one big roll like we did.
In hindsight, if I were to create this style again, I would place the ponytail up a little higher on her head for a more authentic look... keep that in mind if you give this one a try. Also, Cinderella has bangs, and "our princess" does not. So, if you have bangs, all the better for this style! You can style them in front of the headband just like Cinderella.
Supplies needed to recreate this look:
- 3 medium size elastics
- Several bobby pins
- Topsy tail (optional)
- Blue headband or ribbon
- Finishing hair spray, pomade, or gel
Cinderella Hairstyle Video Tutorial: Click here to watch the video directly on YouTube.
Looking for a different Disney Princess hairstyle? In years past we have recreated several, including:
Belle
Jasmine
Elsa
Anna
Aurora
Enjoy!
Pirate Girl Hairstyle, Halloween Hairstyles
ARrr Matey!
We have had many requests for quick and easy Halloween hairstyle tutorials this year, and today we are showing the second easy hairstyle in our "Halloween Hair series," the "Pirate Girl Hairstyle." (If you missed our first Halloween hairstyle from last week, click here to see a fun Genie Hairstyle.)
This style is very simple, easy, and cute. We like that you could change this style up to go as a pretty pirate, a scary pirate, or even as more of a gypsy character using this same concept!
We wanted her hair to be sort of tousled and natural looking, aka "Pirates of the Caribbean." So, to create the waves in her hair, I did a couple of French braids the night before. If you are going for more of a "pretty pirate" look, I would suggest a curling wand, curling iron, hot rollers, or other heatless curling method which creates more sleek looking curls.
Supplies Needed:
- A bandana, scarf, or square piece of fabric. (We purchased our bandana at Walmart for $1.) If you prefer, you could fold the bandana into a rectangular "headband" to go around her head, instead of tying it over her head like we did in the video below.
- You can add accessories such as feathers, beads, fabric, ribbons, etc. (depending on the look you are going for.)
- Earrings, a pirate costume or dress, and some fun makeup would complete this look for a super cute Pirate Halloween costume.
Pirate Hairstyle Video Tutorial: Click here to watch the video directly on YouTube.
Subscribe to:
Comments (Atom)


