Spiral Braid Ponytail, Twist Hairstyles
An Easy, Quick, and Cute Hairstyle
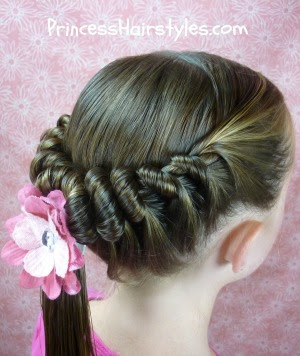
This easy spiral twist hairstyle is actually a redo of one of the very first styles we ever uploaded to Youtube (back in 2009.) You can find the original post on our site here: Twist Hairstyle
I decided the video needed to be redone because our prior tutorial only shows one step in the style and it doesn't make sense if you are watching directly on Youtube. I didn't realize back then that some of you watch our videos on Youtube itself, rather than from our website (which shows the rest of the instructions in picture form) until we started getting comments on Youtube asking us how to finish the style lol. Duh!
We love this style because it is so quick and easy. It's also a great alternative if you don't know how to french braid. If you can twist, wrap, and tuck, you can do this. We chose to make a rope braid as the base for this style, but any type of braid can be used. This also reminds me a bit of a french twist.
This hairstyle is versatile and can be made with wet or dry hair, curly or straight. In our video, the Princess's hair is damp. But, in the picture below, we styled her hair dry. It turns out great either way.
Spiral Braid Ponytail Video: Click here to watch the tutorial directly on YouTube.
Honeycomb Headband Hairstyle Tutorial
Unique Hairstyles:
A Cute Headband Made From Hair!
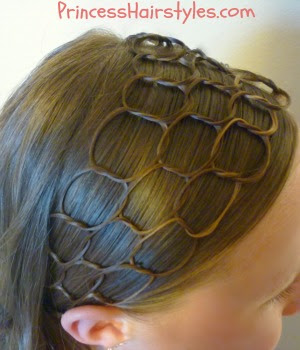
This honeycomb headband hairstyle is a variation of our "chain link headband" which we posted a couple of years ago. The chain headband we made in the past used only one chain instead of several. After finishing this style, we decided the connected circles of the chains looked just like a honeycomb!
This hairstyling technique (which we call chain braiding) can be used to make a variety of interesting and intricate styles. The trick to making the "circles" neatly is to get the hair wet before you begin, or use hair product to prevent flyaways. I prefer water over product because I have found that gel tends to makes her hair sticky and tangled the next day. But, definitely do what works best for you. I know that some hair textures will not stay shaped this way without some type of gel or pomade. It is also helpful to use very small or thin strands of hair to create the knots in the chains.
The way we made our headband hair style in the video tutorial below will require long hair. This style can be adapted for shorter hair though. Instead of tying the chains underneath her head (as shown in our video) you could tie each side with a section of hair behind her ears. Or, you could use these chains to make a completely different hairstyle. The other day we made some chains in the front section of her hair and pulled them back into a half ponytail (which was super cute.)
How to make a "multi chain" hairstyle video tutorial:
I realize this hairstyle probably isn't for everyone, as it is quite different! But, the Princess loves it and always receives lots of compliments and attention when she wears chains in her hair (which she loves.) I'm sure you will too!
3 Minute Updo!
A Cute Twist Hairstyle,
An Easy Updo
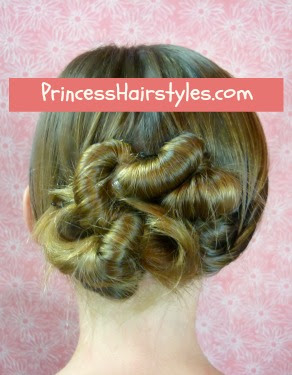
We love this twisted updo because it is super easy and quick. You can literally create this up style is less than 3 minutes! The best part..... there are no braiding skills required. Anyone can do this one (although you will probably need medium length or long hair to pull it off.)
Up do styles such as this can be worn as casual / every day looks for school and work. Or, for elegant and special occasions such as a formal dance (Prom, Homecoming) church, wedding (a bridal hairstyle) etc. You could even add some little flowers, clips, jewels or other "bling" around the twists to make a more fancy hairdo if you desire.
- 1 elastic
- Several bobby pins
- Rat tail comb (optional)
- Standard comb or brush
How To Do Updo Video Tutorial:
If your hair is shorter, or more fine, you might try starting this hair style with 2 ponytails instead of one, as shown in our video tutorial (which would double up the twists.) You could stack the 2 ponytails on top of each other, or set them side by side... whichever you prefer. If you are an "over achiever" you could even try a cute 3 ponytail updo! ;) This same technique could also be used to create a half up hairstyle by starting with a half ponytail (if you are wanting to leave your hair mostly down.)
If you like this easy hairstyle, please let us know by hitting the "facebook like" button and "pin it" buttons below. ;)
Scallop Edge Braid Tutorial
A Unique Braided Hairstyle For Long Hair and Medium Hair
We have been enjoying this fun "scallop edge braid" and have used it to make a variety of cute hairstyles recently!
There was a picture posted on our facebook page awhile back by one of our readers, which was a french braid or dutch braid with the edges of the plait flared out and woven. We decided to try and recreate that braid, but without the french braiding (to simplify it a bit) and this is how it turned out! Btw, I wish I could find that picture now to show you. But, facebook has made some changes to the way things are displayed on our page and I'm finding it very difficult to find older pictures on there now. UGH.
Her hair is getting quite long now, isn't it? I'm loving it with curls! I think this would be a cute hairstyle for a flower girl, wedding, church, recital, school, or even a renaissance faire.
If you are wondering how we created the curls shown in these pictures, we used a regular old curling iron and the curling technique found at this link: How to Curl Hair Video
How To Make A Scallop Edge Braid Video Tutorial:
P.S. If you are a regular to our site, and after watching the video... you may have recognized the technique used to make this braid from our Chain Link Braid Headband video (which used knots instead of a braid.)
- Below is one more fun variation to try with this braid!
(This picture probably won't make any sense unless you have already watched our video above.) But, instead of bringing the top strand underneath the 3 strands as shown in our video... try weaving it over and under the 3 strands, and then add it into the braid (as shown below.)
Making this slight change as you are braiding will result in the braid turning out much more intricate!
Inside Out Fishtail Braid Tutorial
How to create a french fishtail braid... inside out! I guess you could call this a "dutch fishtail?"
This inside out, reverse, or "dutch" fishtail is a very cute bohemian looking braid which is similar to a french fishtail braid, but different ~ as the braid is laying on top of the hair instead of underneath. To see the standard french fishtail braid, we have a video here: Side Swept Fishtail Braid TutorialThis fishtail, fishbone, or herringbone braid can be used to create many different hairstyles including: Casual, bohemian, beachy type hair, as well as elegant updos for special occasions. To enhance this braid, the edges can be stretched (as shown in our pictures and video) creating a more voluminous and disheveled fishtail. It seems that messy and deconstructed braids are very popular and trendy hairstyles among teens, tweens, and adults right now.
I actually saw a braid like this awhile ago in a picture, and of course, wanted to figure out how it was made. Usually I can look at a braid and figure out the stranding pretty quickly. But, this one took me awhile to "decode" and I'm not sure why, because as you will see in our video tutorial below, it is actually not that complicated!
For church one Sunday, we opted to use this braid to create a fishtail updo, which was made by wrapping the braid up into a side bun and securing with couple of bobby pins. The princess and I absolutely love this cute hairstyle and plan to use it again for an upcoming wedding. I wish my hair was long enough and I would be wearing it as well!
How to make an inside out fishtail braid video tutorial:
While filming this tutorial, I took larger strands than I normally would (to save time) and the braid didn't turn out quite as intricate or "fishtaily" as I would have liked. If thick strands are taken, the braid ends up looking more like a regular 3 strand dutch braid and isn't quite as interesting. The pictures we used throughout this post were taken on a different day, and show how the braid will look with smaller strands taken (which is a little more time consuming.)
Subscribe to:
Posts (Atom)


