Top 12 Hairstyles of 2015
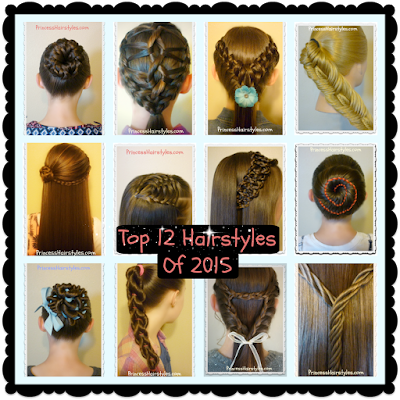
Our annual tradition! Please enjoy a countdown of our top 12 favorite hairstyles that were posted on "Princess Hairstyles" this year.
Top 2015 Hairstyles Showcase Video: (Click here to watch the video directly on YouTube.)
Tutorial links for each of the hairstyles shown:
#12 - Pinwheel Bun Shortcut
#11 - Licorice Braid
#10 - Ribbon Coiled Bun
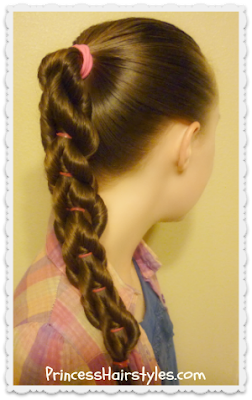
#9 - Twisted Pull-Through Braid
#8 - DNA Braid
#7 - Hook And Ladder Braid
#6 - Triangle (or Heart) Braid
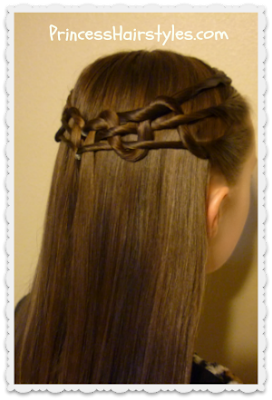
#5 - Braided Rosette and Feathered Headband Hairstyle
#4 - Ribbon Swirl Bun
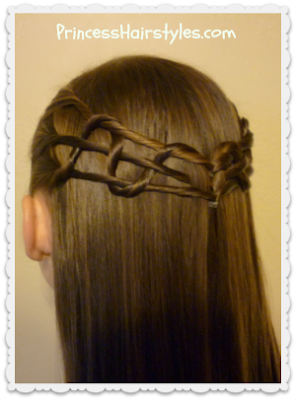
#3 - Braided 4-Strand Slide Up Accent
#2 - Woven Pyramid Half-Up Hairstyle
#1 - Stitched Fishtail Braid
Thanks so much to each and every one of you for watching and supporting us this past year! See you in 2016!!
Check out our top hairstyles countdown videos from past years here:
2014
2013
2012
2011
Braided Ornament Hairstyle, Christmas Hair
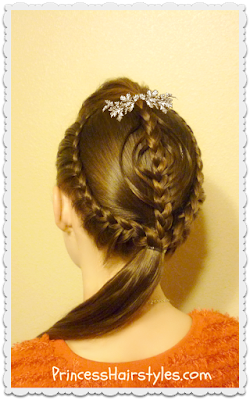
We wanted to fit one more Christmas hairstyle in for you this year and decided on this unique "braided ornament." The inspiration for this style comes from a braid we posted a couple of years ago on our blog (which we named the "cookie cutter.") We decided to try a variation of this braid and frame the center of the style with lace French braids in a circular shape, which we were hoping would resemble a round ornament ball!
As shown in our tutorial, we added a pompadour in her bangs area and brought the rest of her hair back into a low ponytail. Of course, if you would rather braid the ponytail or wrap the remaining hair up into an updo, you could do that instead. Fancy holiday accessories such as a bow, or holly could be added to dress up the top or bottom of this ornament. "The Princess" was attending a fancy holiday occasion the day we filmed this style and we wanted more of a subtle, elegant look. But, if you want your ornament to stand out more, you could add ribbon to the braids framing the ornament. Red, green, white, silver, or gold ribbon would be so pretty and festive.
Christmas Ornament Hairstyle Video Tutorial (Click here to watch the video directly on YouTube.)
This hairstyle would be great for Christmas, Christmas Eve, a holiday party, school, church, New Years, holiday dinners, or other special occasions.
Pinwheel Bun Shortcut Tutorial
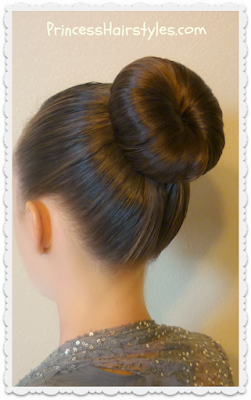
Today we are showing a quick and easy "hack" for creating one of our all time favorite hairstyles, the "pinwheel bun." My daughter loves to wear the pinwheel bun to dance class and occasionally to school or church. But, the one complaint we have with our original method is that it can be quite time consuming. Not to mention, it is a bit of a hassle to take the bun down when you are done wearing it. This new variation (shown in our video today) is quick, easy, and comes out effortlessly when you are done.
The idea for this "shortcut" came to us a few months ago when my daughter had a dance competition and we were using "the perfect bun" to make her standard performance hairstyle (shown in our latest tutorial.) We wondered how the bun would turn out if we braided her hair first, and loved that the end result looked almost identical to a braided variation of the pinwheel bun (also known as the "bun of braids.")
Of course, there are several variations of the pinwheel that can be created using this technique. If you want the bun to be more of a twisted texture (like the original) I would suggest utilizing twist braids (or rope braids) instead of standard 3 strand braids in your ponytail. You could really do any type of braids you want for many different options and variations of this updo.
Pinwheel Bun Shortcut Video Tutorial: (Click here to watch the video directly on YouTube.)
As mentioned in our video, the number of braids you will need to cover the bun foundation is going to depend on your specific hair texture and length. The longer your hair is, the more times the braids will be wrapping around the foundation to provide more coverage.... so you will need less. And obviously, thicker hair is going to cover more of the surface area, which means less braids will be needed as well. If your hair is on the thinner side, I would suggest stretching the braids out before you wrap them up to help cover more area. Also, if you find a "perfect bun maker" close to the color of hair you are working with, it's not going to matter as much if some of it shows through.
Supplies needed to recreate this bun:
- 2 ponytail holders or hair elastics
- Alligator clip or temporary hair ties to keep the braids from unraveling while you work.
- Several bobby pins
- A bun foundation as shown in our video. The one we used is called "the perfect bun" and can be found online or in stores. (affiliate.)
- Finishing hairspray (optional)
This bun would be a great hairstyle for dance, gymnastics, ballet, figure skating and sports, or for formal events such as prom, homecoming, weddings, holidays, and church.
Christmas Tree Hairstyle
Hi, I am "Hair By Lori." Thank you so much to Princess Hairstyles for having me as a guest on her blog!
I am so excited to share my Ribbon Christmas Tree Braid with you today. When I first started trying different Christmas hairstyles, I was excited because I could do anything. Christmas is a time when “tacky” magically becomes “cool”!
However, I was even more excited when I realized that a tree braided into the hair didn’t just have to be tacky – it could be pretty too. I think that this style is one that can be dressed up with curls and while it still might be tacky any other time of the year, at Christmas it is magical and beautiful.
This Ribbon Christmas Tree Braid is a style that will get you so much attention. It’s perfect for all of your Christmas events – from an ugly sweater party, to a school holiday party to a family event – this will be the style that everyone is talking about!
Ribbon Christmas Tree Hairstyle Video Tutorial (Click here to watch the video directly on YouTube.)
To make this hairstyle even easier for you to recreate – my Hair by Lori EZDO Christmas Tree Braid Kit is now available on Amazon.com (affiliate.) The kit comes with everything you need to recreate this festive hairstyle at home: step by step instructions, ribbon, elastics, star for the top of the tree and your choice of decoration. You can choose from Garland, Ornaments and LED Lights.
The Ornaments are one of my favorites because they are so beautiful and give the style a more dressed up look. I also LOVE the LED Lights that you get in my kit. They do not get hot so they are safe to wear in the hair. The battery pack is lightweight and small, so it’s easy to wear and easy to hide in the style. The length of the light string is perfect for the style. You’ll certainly stand out with whatever option you choose.
The only warning I’ll leave you with is be prepared for lots of attention! We have worn it out to the store and running errands and everyone stops my girls to look at their hair. We’ve even had a few people ask if they could take photos! Though the way that it makes my girls smile proudly, it’s worth the extra time to indulge the onlookers. ;-)
Lori Bryant blogs at HairByLori.com. She is a wife and homeschooling mom of 4 littles. Lori is passionate about helping girls feel good about themselves through cute hairstyles!
The Perfect Dance Bun and No-Heat Curls Tutorial
This week we are adding another "dance bun" technique to our collection! The princess's standard dance team hairstyle this year is a classic donut bun / sock bun. And, I'm sure many of you who dance are required to wear this hairstyle from time to time for competitions and recitals as well. It seems to be the standard "go to" style for many teams as it is very simple and looks polished besides.
We have shown several different methods for making this type of bun in the past and are always up for trying something new. Each technique we have tried seems to have its pros and cons. A lot of deciding which bun is best for your dancer is going to depend on her hair texture and length. We both liked this "perfect bun" kit (made by Remington) and think it is one of the easier methods for wrapping up long hair into a bun. The first time we tried it we were slightly worried that it may unroll itself (since there is really nothing visible holding it together) but luckily we have not had a problem with it coming out mid-dance yet! I would definitely recommend using bobby pins all the way around the bun (as demonstrated in our tutorial below) to be sure though.
The "Perfect Bun" Video Tutorial and Review, Plus No-Heat Curls Demo: (Click here to watch the video directly on YouTube.)
One of our favorite perks of wearing this bun is the cute no-heat curls or waves you will be left with when you take the bun down. As mentioned in our video, the curls will turn out best when the hair is wrapped up slightly damp and the bun is left in long enough for the hair to dry completely before taking it out.
Supplies needed to recreate this bun:
- A bun form. We purchased our "perfect bun" maker at either Walmart or Target (we have had it for awhile and I don't remember which!) If you are having trouble finding one, they are also sold online. Click here to see it on Amazon (affiliate.)
- A ponytail holder.
- Several bobby pins.
- Pomade or gel and finishing hairspray.
- Water.
Easy dance bun using donut form and hair net
Donut bun with no leftover ends
Hot cross bun
Pinwheel bun
Dance bun with ribbon
Braided bubble bun
Snake Weave Tie Back Hairstyle
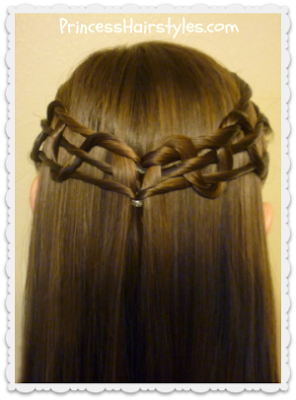
Hey guys! This fun half-up "snake weave tie back" hairstyle is inspired by a photo we saw by "Girlz Haircreations." We thought the original style was so cute and have been wanting to try it out for over a year now! So, this is our take on it... with a slight twist (literally.)
The princess really loves this style and thought the end result looked a lot like a "crown of snakes" slithering through her hair. (Hence the name "snake weave tie back.")
This would be a great hairstyle for school or work, as it is fairly quick and easy. And, I could see this looking cute on teen hair, as well as for little girls. As mentioned in the video, we show how to alter the style if your hair is on the shorter side. I think this would probably work on hair that is shoulder length and longer.
Snake Weave Tie Back Video Tutorial: (Click here to watch the video directly on YouTube.)
Supplies needed to recreate this look:
- 3 small hair elastics.
- Pomade, gel, hair wax, or water.
- This hairstyle stayed in just fine "as is" when we tried it. But, depending on your hair texture and length, you may want to add an extra bobby pin or elastic on the last time through the weave, to help hold things together.
French Braid Tuck, Holiday Updo Tutorial
This week we are showing a simplified variation of one of our favorite hairstyles that we posted a few years ago, the "swirling braids updo." And although the original hairstyle is gorgeous, it is a little more time consuming. Today we wanted to show a super quick and easy (but still elegant and pretty) updo for those occasions when you don't have a lot of time, but still want to look polished, sophisticated, or fancy. This has been our "go to" style for many occasions (since it is so quick and easy) and would be great for the upcoming holiday season: Thanksgiving, Christmas, New Years, etc. I could also see this working for Prom, Homecoming, Weddings, church, recitals, communions and other special occasions. If you know how to French braid, this hairstyle should be very easy for you and not take more than a few minutes to create!
French Braid Tuck Updo Video Tutorial: (Click here to watch the video directly on YouTube.)
Supplies needed to recreate this hairstyle:
- 1 clear elastic or hair tie.
- Several bobby pins.
- Topsy tail. We purchased ours online (the brand is Conair.)
This up-style should work on long hair and medium hair. In the video tutorial (above) we show a few ideas to alter the style for the length of hair you are working with.
DIY Relaxed French Braid Tutorial
This week we are happy to have our friends from "Hairburst Tutorials" guest posting on Princess Hairstyles! Head on over to their channel after watching this tutorial to see more of their cute hairstyle ideas and videos.
This DIY French Braid is super easy, quick, and fun to make for many casual occasions. We love the beachy, relaxed, loose, and slightly messy look of this braid (which is so popular and trendy right now.) This 5 minute hairstyle will work great with medium length and long hair. Curly, straight, or wavy.
We are always getting requests for DIY videos, so we are excited to be able to offer this tutorial today (for those of you who like to see hairstyles being made on someone's own head!) This braid would also be great if you are in the process of learning how to French Braid, as you only need to add a few strands in on each side.
DIY relaxed French Braid video tutorial: (Click here to watch the video directly on YouTube.)
Supplies needed to recreate this hairstyle:
- 1 medium size hair elastic to tie off the end of the braid.
- Finishing hairspray, pomade, or gel (optional.)
Ribbon Coiled Bun Hairstyle Tutorial
This week we are showing how to make a unique "coiled bun" updo hairstyle. This bun would be great for dance, ballet, figure skating, recitals, communions, weddings, (a cute flower girl hairstyle) for church, holidays, special occasions, etc.
The technique used to make this bun is fairly easy and quick. If you know how to make a rope braid and a slide-up braid (or snake braid) this should be a cinch for you. As mentioned in our video tutorial (below) there really is no exact science to creating this bun and some of it will depend on the length of hair you are working with. These coils can be manipulated somewhat to be stretched longer, or scrunched up shorter... and you can really arrange them however you want to form the updo.
We chose to tie our leftover ribbon into a bow at the side of the bun for a sweet "girlish" touch. The bow can also be placed at the bottom of the bun, or at the top of the bun (depending on how you arrange your coils.) Of course, If you prefer not to add a bow to your updo at all, you can clip your ribbon and tuck in the ends for more of a grown up look.
Ribbon Coiled Bun Video Tutorial: (Click here to watch the video directly on YouTube.)
Supplies needed to recreate this bun:
- 1 hair tie or elastic to make the initial ponytail.
- 4 medium size clear elastics.
- 2 pieces of ribbon. (Our ribbons were each about 4 feet long and 1 inch thick.)
- Several bobby pins.
We featured a similar technique several years ago in our "spring rings hairstyle" in which we used 2 thin strands of hair to make the rope braid and slide up. We used this technique to accent a simple half up style in that tutorial. With the original technique, you end up with one long stand of hair and one coiled strand, which isn't ideal for some hairstyles. We decided to try making the coils using ribbon (instead of hair) this time to eliminate the one long remaining strand of hair and ended up loving how the ribbon looks peeking through, especially when pinned up into a bun. The other perk of using ribbon instead of hair becomes apparent when the coils are taken down the next day, and all of your hair is curled into ringlets (instead of only half of it.) You could actually use this as a no heat curling method if you wanted to!
At the end of our video tutorial we show how to make a super easy 5 minute messy bun with the 2nd day coils. This is just an example of an endless amount of styles that could be made with these fun ringlets.
We first saw the original unique looking coiled braid accented on a style at a Renaissance Faire several years ago and have used it a few times since in a variety of styles. I think this ribbon bun variation is our favorite so far! We have also seen several pictures of hairstyles using the original technique to accent hairstyles on Pinterest and Facebook. Two accounts I have noticed who have used this braid in a variety of hairstyles are "cute and glossy" and "hair braiding" if you are looking for more ideas.
Twisted Pull Through Braid Hairstyle
This week we are showing a cute new variation of the trendy "pull-through braid." I'm guessing most everyone has seen the original pull through braid floating around the internet, as it has become very popular recently in social media. We love the original braid and decided to add a fun "twist" for a slight change and really like how it turned out. It is funny how just a small change can make a whole new look! You may remember the "reverse pull through braid" we posted last year (which is another variation of this braid.) The reverse pull-through is one of "the Princess's" all time favorite hairstyles and she wears it often. We are loving the "chunky" and "twisted" look of this new version.
We have found that this braid is quite durable and should hold up well for school and even sports. This braid can be made in a ponytail, (as shown) in a low side braid style, or even as a French/dutch braid. We usually create this braid on damp hair to help avoid flyaways. But of course, you can do this on dry hair if you prefer. You may find that gel, pomade, wax, or other product is helpful. Or if you are wanting more of a relaxed or messy braid, you don't need to use any product at all. ;)
Twisted Pull Through Braid Video Tutorial: (Click here to watch the video directly on YouTube.)
Supplies needed to recreate this braid:
- 1 hair tie or ponytail holder for the top of the braid.
- Several small hair elastics (the amount will depend on the length of hair you are working with.)We chose to use Goody colored elastics for our ponytail as a fun accent. And as you can see, the elastics tend to show up much more in this twisted version than in the original braid. You can use clear elastics, or the same color as your hair for a more subtle look if you desire.
- Gel, pomade, hair wax, or similar, to help avoid flyaways (optional.)
In case you haven't seen the original pull-through braid, we have several example YouTube tutorials linked below, featuring some of our friends and other lovely hair vloggers:
Cute Girls Hairstyles
Makeup Wearables
Hair and Nails Inspiration
Annie's Forget Me Knots
Our Reverse Pull Through Braid (Princess Hairstyles)
Halloween Hairstyles, Queen Elinor Hair
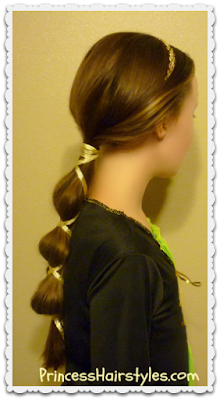
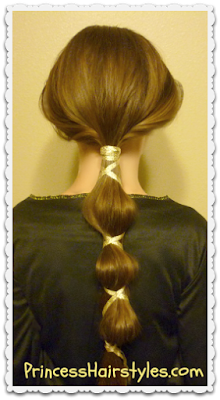
We are continuing on with our "Halloween Hairstyles series" this week with a fun Queen Elinor inspired ribbon wrapped ponytail (as seen in the Disney movie "Brave" on Merida's mother.)
We noticed Queen Elinor actually wears 2 variations of this hairstyle in the movie; The first, as a single ponytail (which we chose for our tutorial today.) And the other is basically the same concept, only doubled up in 2 ribbon ponytails (or pigtails) laying side by side. I think both styles are gorgeous and perfect to go with a variety of medieval, princess, queen or royal costumes.
We are loving the effortless look of this ponytail and would actually consider wearing it on regular occasions (such as school) and not just for dressing up.
Depending on the thickness of your hair, you may want to tease it slightly to add more volume... or you can choose to skip that step and leave it "as is." We love the "bubbled" look of the ponytail, which was made by stretching the hair between the ribbon (shown in our video tutorial below.) But, this step can also be skipped if you prefer your ponytail to lay more straight and sleek.
Queen Elinor Hairstyle Video Tutorial: (Click here to watch the video directly on YouTube.)
Supplies needed to recreate this style:
- 1 ponytail holder or large elastic.
- 1 medium, clear elastic or small ponytail holder.
- We chose some gold ribbon for wrapping around our ponytail. You can use whatever you have on hand (leather, yarn, rope, ribbon, etc.)
- We also added a gold braided headband accessory to accent the style. Queen Elinor of course was wearing a gold crown if you really want your costume to be authentic. ;)
- An Elinor costume to go with your hairstyle (optional of course.) We found the dress shown in our photos at a local store in the Halloween section.... and it wasn't actually meant to be a Queen Elinor costume.
Princess Leia Hairstyle, Spiral Braid Bun, Star Wars Inspired
This week we are doing another fun Halloween Hairstyle tutorial for any of you who may be thinking of dressing up as Princess Leia this year! This would also be a great hairstyle to wear to the theatre for the upcoming new Star Wars Movie "The Force Awakens." Although, I think this style is actually very pretty and not too "weird" to wear for other occasions as well. ;)
When I picture "Princess Leia hair" in my mind, I most often think of the famous large pigtail buns she wore wrapping over her ears, which is probably her most iconic hairstyle. But, I recently watched several of the older Star Wars episodes and noticed this elegant braided updo from the ceremony in "New Hope." We thought this braided style was so gorgeous, we wanted to give it a try.
If I had to guess, the original hairstyle (done on Carrie Fisher) most likely involved using some extensions for both thickness and length. Either that, or she has some seriously crazy long and thick hair! We thought it would be fun to try and achieve a similar result with just "The Princess's" natural hair and a bun maker. Although our braided bun didn't turn out to be quite as large and glamorous as the original style, I think it still turned out cute. This style should be achievable even with fairly thin hair, although you will need some length. If your hair is on the shorter side, you may in fact have better luck using some extensions, a braided hair piece, or a wig
Princess Leia Hairstyle Video Tutorial: (Click here to watch the video directly on YouTube.)
Supplies needed to recreate this hairstyle:
- Bun maker, hair donut, or sock bun.
- 1 ponytail holder or large hair elastic.
- 2 medium size hair elastics.
- 3 small, clear, hair elastics.
- Several bobby pins.
- Fairly long hair.
Mosaic Twist Braid Tutorial, Easy Hairstyles
Our hair tutorial this week features an easy rope braid / twist braid variation. We originally filmed this style a couple of months ago for our back-so-school hairstyle series... but just didn't get around to posting it until now. This unique looking side braid is a perfect hairstyle for school, as it is fairly quick, and can be created with wet or dry hair. "The Princess" has made this braid a few times on herself and finds it quite easy and fun. I would say this is a good DIY hairstyle to try, even for beginners.
As the weather is getting colder, we also thought this would be an adorable hairstyle to wear under a hat or beanie... something cute and different (rather than a standard braid) to go with your fall fashion.
This braid could also be pinned up into a bun or updo. which creates a gorgeous pattern that looks quite intricate when it is wrapped up.
Mosaic Twist Braid Video Tutorial: (Click here to watch the video directly on YouTube.)
Depending on how you want your braid to look, you can create many small rope braids as your 3rd strand, or just a few larger ones like we did. Also, you can choose to stretch out the edges of your braid for a thicker/messier look, or leave it "as is" for more of a polished finish.
Supplies needed to create this braid:
- Several temporary hair ties or clips to hold the ends of your braids while you are working.
- 1 medium size clear elastic or hair tie for the bottom of your finished braid.
- Gel, pomade, or water to help control flyaways (optional.)
- Finishing hairspray (optional.)
Disney's Descendents Hairstyle Tutorial - Evie
Our hair tutorial this week (and our first Halloween Hairstyle of the season) is inspired by a fun style we saw on Disney's new show "Descendants" which was worn by "Evie" ie Sofia Carson.
In the original style, Evie is wearing a blue/purple woven or braided headpiece (which sort of resembles a crown or tiara) sitting atop her classic dark blue hair. We wanted to create a DIY of something similar, as well as something simple and inexpensive for anyone who is planning on dressing up as Evie for Halloween... or for anyone else just because it's a cute style!
Descendants "Evie" Hairstyle Video Tutorial: (Click here to watch the video directly on YouTube.)
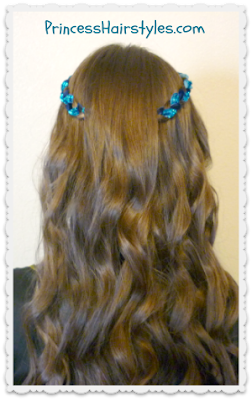
P.S. If you are wanting to make some curls or waves to go with your headpiece (like Evie is wearing) feel free to watch our curling wand tutorial.
As shown in our video tutorial (above) we braided our headpiece right into "the Princess's" hair. This is not actually necessary. If your hair is too short, or if you would rather make the headpiece on its own and bobby pin it into place, you definitely can. We just thought it would be a fun way to keep the headpiece in place without having to use bobby pins or clips and worry about it falling out while trick-or-treating!
You may have noticed in our photos and video that we are showing 2 different ways to finish this style. Depending on your personal preference, you can either leave the braids sitting on top of the hair (as shown above) or you can drape some hair over the back/center of the headpiece to hide the elastic and give the hairstyle more of an authentic look to the original style (shown below.)
Supplies needed to recreate this look:
- Ribbon: We found the 2 rolls of ribbon shown in our tutorial at our local craft store in the discount bin for 50 cents each. You can really use any ribbon you want, but I would suggest finding some that is around 1/2 inch thick to easily create the "point" in the front of the headpiece. We used around 3 feet of each roll.
- If you have beads, you could thread the beads onto the ribbon and randomly add them throughout the braid for added bling and sparkle.
- If you really want to make this hairstyle authentic, you could actually dye or spray your hair dark blue! Or you could look for a blue wig, which would be less messy. ;)
- Curling iron/wand or other curling method if you are wanting curls.
- 1 medium/clear elastic.
- Finishing hair spray (optional)
- Hot glue gun
- Scissors
Hourglass Braid, Cute Hairstyles
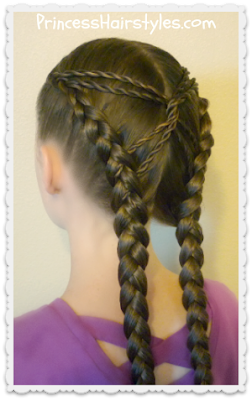
For our hairstyle tutorial this week, we have combined several braiding techniques: Dutch braids, feather braids, rope braids, and a double twist to create a fun "hour glass" braid hairstyle.
This style would be great for school, sports, and other casual occasions. We love that these braids stayed neatly in place all day when "the Princess" wore this recently.
We have used the double twisting technique featured in the center of this hairstyle several times before in the past, most recently in our "arrowhead braid" half up style. We love the pattern the twist makes with the rope braids all combining in the center of this style. Of course, If you want to use more than 2 braids on each side, you can definitely add as many as you like. Also, French braids can be utilized instead of Dutch braids if you prefer.
Hourglass Braid Video Tutorial: (Click here to watch the video directly on YouTube.)
Supplies needed to recreate this style:
- Several temporary hair ties or clips to keep the braids from unraveling while you work.
- 2 medium elastics for the bottom of the braids
- gel, pomade, or water to help with flyaways
- finishing hairspray
Subscribe to:
Comments (Atom)

